Archive

Posts Tagged ‘WPF’

WPF Behavior Samples

April 13th, 2009

Behaviors in WPF and Silverlight are one of the features that were introduced with Blend 3, and unlike attached behaviors, they benefit from full designer support in Blend 3, thus providing a much higher level of accessibility to developers and designers alike.

Laurent Bugnion has posted a great tutorial where he walks you through the various aspects of a magnifying glass behavior, and Jeremiah Morrill generates eye candy through a behavior that adds glass effects to your visuals.

Last but not least, the Expression team created a new section on the Expression Gallery that is dedicated to behaviors. I sure like shiny new toys ;-)

Tags:

WPF NotifyIcon - Release Candidate

April 1st, 2009

This is an implementation of a NotifyIcon (aka system tray icon or taskbar icon) for the WPF platform.

image

Update:

The control has now its own project page. Please go to

http://www.hardcodet.net/projects/wpf-notifyicon

Moving WPF DataGrid Rows using Drag and Drop

March 24th, 2009

For my upcoming NetDrives tool (will be released shortly) I wanted to enable the user to reorder managed network shares using drag and drop using a preview of the dragged row:

image


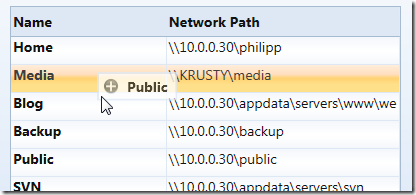
As it turned out, it’s not too hard to implement, but it took my a while to find all pieces of the puzzle, so I compiled a short sample. You can find the sample link at the end of the article.


Drag Indicator Popup

I used a popup as an drag indicator, which I bound to the item that was currently dragged (DraggedItem dependency property):

<!-- the popup that is displayed if user moves rows -->
<Popup
  x:Name="popup1"
  IsHitTestVisible="False"
  Placement="RelativePoint"
  PlacementTarget="{Binding ElementName=me}"
  AllowsTransparency="True">
  <Border
    BorderBrush="{DynamicResource CellBorderBrush}"
    BorderThickness="2"
    Background="White"
    Opacity="0.75">
    <StackPanel
      Orientation="Horizontal"
      Margin="4,3,8,3">
      <Image
        Source="/Shared/Images/DragInsert.png"
        Width="16"
        Height="16" />
      <TextBlock
        Style="{DynamicResource DefaultLabel}"
        FontWeight="Bold"
        VerticalAlignment="Center"
        Text="{Binding ElementName=me, Path=DraggedItem.Name}"
        Margin="8,0,0,0" />
    </StackPanel>
  </Border>
</Popup>


Disabling Drag and Drop in Edit Mode

I didn’t want to enable drag and drop if the grid was in edit mode. Accordingly, I registered two event listeners on the grid:

<dg:DataGrid
  BeginningEdit="OnBeginEdit"
  CellEditEnding="OnEndEdit"
  .. />


The corresponding event listeners just set the IsEditing flag, which is evaluated when handling mouse events:

/// <summary>
/// State flag which indicates whether the grid is in edit
/// mode or not.
/// </summary>
public bool IsEditing { get; set; }

private void OnBeginEdit(object sender, DataGridBeginningEditEventArgs e)
{
  IsEditing = true;
  //in case we are in the middle of a drag/drop operation, cancel it...
  if (IsDragging) ResetDragDrop();
}

private void OnEndEdit(object sender, DataGridCellEditEndingEventArgs e)
{
  IsEditing = false;
}


Listening to Mouse Events

In order to display and move the popup with the mouse, I registered listeners for the following three mouse events:

  • PreviewMouseLeftButtonDown (on the datagrid)
  • MouseLeftButtonUp (directly on the layout root)
  • MouseMove (directly on the layout root)


Note: I started with listeners on the grid only, which caused some side effects. Apparently, the datagrid (current March release) not always fires the mouse events properly. This caused choppy animations when hovering over certain cells. Fortunately, this is not an issue with the MouseMove event of the layout root.


Starting Drag and Drop

DnD is started as soon as the user presses the left mouse button on the datagrid. I had to use the PreviewLeftMouseButton event in order to get the notification, and I needed to determine the clicked row based on the mouse position. I blogged about finding an element under the mouse a while ago here, but the UIHelpers class is part of the sample project here.

My mouse button event listener basically does the following:

  • Check if the mouse is being placed over a grid row.
  • Set the IsDragging flag to true.
  • Store the dragged item in the DraggedItem dependency property (used by the popup to display the name).


private void OnMouseLeftButtonDown(object sender, MouseButtonEventArgs e)
{
  //exit if in edit mode
  if (IsEditing) return;

  //find the clicked row
  var row = UIHelpers.TryFindFromPoint<DataGridRow>((UIElement) sender,
                                                    e.GetPosition(shareGrid));
  if (row == null) return;

  //set flag that indicates we're capturing mouse movements
  IsDragging = true;
  DraggedItem = (IShareConfiguration) row.Item;
}


Moving the Popup

I registered a listener for the MouseMove event directly on the layout root (not on the datagrid). Basically, the event listener just moves the popup to the current mouse location along with a few minor tasks:

  • If the popup has not been opened yet, display it.
  • Set the grid to read-only.
  • Reposition the popup by setting the PlacementRectangle property.
  • Make sure the grid row under the mouse is being selected. Once again, this didn’t work reliably if I relied on the datagrid to do it by itself.


/// <summary>
/// Completes a drag/drop operation.
/// </summary>
private void OnMouseLeftButtonUp(object sender, MouseButtonEventArgs e)
{
  if (!IsDragging || IsEditing)
  {
    return;
  }

  //get the target item
  ShareConfiguration targetItem = (ShareConfiguration) shareGrid.SelectedItem;

  if (targetItem == null || !ReferenceEquals(DraggedItem, targetItem))
  {
    //remove the source from the list
    ShareList.Remove(DraggedItem);

    //get target index
    var targetIndex = ShareList.IndexOf(targetItem);

    //move source at the target's location
    ShareList.Insert(targetIndex, DraggedItem);

    //select the dropped item
    shareGrid.SelectedItem = DraggedItem;
  }

  //reset
  ResetDragDrop();
}


Finishing Drag and Drop

Once the user releases the mouse button, I need to perform the actual drop operation. I already had the dragged item (DraggedItem property, was set when the operation started) so all I needed was the drop target. My target is the currently selected row.

/// <summary>
/// Completes a drag/drop operation.
/// </summary>
private void OnMouseLeftButtonUp(object sender, MouseButtonEventArgs e)
{
  if (!IsDragging || IsEditing || shareGrid.SelectedItem == null)
  {
    return;
  }

  //get the target item
  IShareConfiguration targetItem = (IShareConfiguration)shareGrid.SelectedItem;

  if (!ReferenceEquals(DraggedItem, targetItem))
  {
    //the actual business logic that works on source and target
  }

  //reset
  ResetDragDrop();
}


You might also want to check whether the mouse is currently over the grid (or a grid row) or not - in that case just use the TryFindFromPoint method from the UIHelpers class.


Cleaning Up

The ResetDragDrop method just performs a cleanup of the code by closing the popup and adjusting a few properties:

/// <summary>
/// Closes the popup and resets the
/// grid to read-enabled mode.
/// </summary>
private void ResetDragDrop()
{
  IsDragging = false;
  popup1.IsOpen = false;
  shareGrid.IsReadOnly = false;
}


Download Sample: http://www.hardcodet.net/uploads/2009/03/datagrid_dragdrop.zip

Tags: ,

Format WPF Bindings With Resource File Lookups

March 21st, 2009

This post explains a pattern that combines Data Binding, the new StringFormat property and resource lookups through the application of a custom MarkupExtension.


StringFormat

Microsoft introduced the StringFormat property with SP1 for .NET 3.5. StringFormat often eliminates the need for a custom converter if you just need to format a bound value.
Here’s a very simple sample that displays hello xxx on the screen (where “xxx” is the value entered in a TextBox control:


<TextBox
    x:Name="name"
    Text="world" />

<TextBlock
    Text="{Binding ElementName=name,
                   Path=Text,
                   StringFormat=hello \{0\}}" />


Resource Files

I often use resource files to store strings - not only for localization tasks but also in order to maintain strings that are intended for users at a central place. My resource strings often contain placeholders which are populated at runtime using String.Format:


image


//use resource file to create message
var msg = Resources.Ask_Whether_To_Connect_To_New_Share;
msg = String.Format(msg, configuration.Name);

//display dialog
MessageBoxResult doConnect = Dialogs.ShowYesNo(msg);


Bringing Bindings and Resource Files Together

In the sample above, I accessed the resource file programmatically. In XAML however, I prefer a declarative approach. In order to get there, I implemented a simple MarkupExtension that allows me to do just that:


<!-- Display a formatted text -->
<TextBlock
  x:Name="Title"
  Text="{Binding Path=Name,
                 StringFormat={ext:Resource Ask_Whether_To_Connect_To_New_Share}}"

 />


The above snippet results in a formatted text being displayed:

image


Resource MarkupExtension

Here’s the markup extension. As you can see, it’s fairly trivial. Do note that the reference to the application’s Resources file is hardcoded - you will have to set a using statement or adjust that line in order to use your custom resource file.


/// <summary>
/// A markup extension that provides simple access to a given
/// entry in the application's <see cref="Resources"/> file.
/// </summary>
public class Resource : MarkupExtension
{
  /// <summary>
  /// The resource key to be used for the lookup.
  /// </summary>
  public string ResourceKey { get; set; }

  /// <summary>
  /// Inits the <see cref="Resource"/> markup extension
  /// with the key to be assigned.
  /// </summary>
  /// <param name="resourceKey">The resource key to be assigned.</param>
  public Resource(string resourceKey)
  {
    ResourceKey = resourceKey;
  }

  /// <summary>
  /// Performs a lookup for the defined <see cref="ResourceKey"/>.
  /// </summary>
  /// <returns>
  /// The value of the resource that is specified by the
  /// <see cref="ResourceKey"/> property. If the property is not
  /// set, a null reference is returned.
  /// </returns>
  public override object ProvideValue(IServiceProvider serviceProvider)
  {
    if (String.IsNullOrEmpty(ResourceKey)) return null;
    return Resources.ResourceManager.GetObject(ResourceKey);
  }
}


Enjoy :)

Tags: ,

ComboBox SelectedItem and ItemsSource: Order Matters

January 14th, 2009

A co-worker of mine had a strange issue with a bound combo box that looked like this: 

<ComboBox
  x:Name="cboParentUser"
  ItemsSource="{Binding Path=Order.Store.Users, ElementName=me, Mode=Default}"
  SelectedItem="{Binding Path=Order.ParentUser, ElementName=me, Mode=Default}"
  IsEditable="False"
  DisplayMemberPath="UserName" />


As we could observe at runtime, selecting an item in the combo box properly updated the underlying ParentUser property. Furthermore, we could easily exchange the data context (Order dependency property) in order to edit different items.

However: As soon a the editor control that contained the combo box was unloaded, the ParentUser property of the currently edited Order was set to null, so all previously made adjustments were lost.

The reason behind this behavior seems to be the fact that both ItemsSource and SelectedItem are bound to the same dependency property: Apparently, when Order is set to null during unloading, WPF realizes that the ItemsSource is no longer valid, and therefore clears the SelectedItem, to which the combo box still appears to hold a reference at this moment - which brings it down to a question of proper coercion. Or maybe not - the reason behind this is not entirely clear to me.

However: Changing the declaration order of SelectedItem and ItemsSource fixes the problem:

<ComboBox
  x:Name="cboParentUser"
  SelectedItem="{Binding Path=Order.ParentUser, ElementName=me, Mode=Default}"
  ItemsSource="{Binding Path=Order.Store.Users, ElementName=me, Mode=Default}"
  IsEditable="False"
  DisplayMemberPath="UserName" />


And yes: This does feel like a dirty hack.

Tags: ,

Combining WPF Validation Rules and IDataErrorInfo to Resolve Conversion Errors

January 8th, 2009

This article discusses a few approaches to overcome binding conversion errors in WPF by combining model validation (through IDataErrorInfo) and WPF validation rules. Practically, I’m going to outline three approaches to the same solution:

  • Inline declaration
  • Using attached properties
  • Using custom binding classes


image

The Problem

WPF validation through IDataErrorInfo is a great feature if you already have validation logic in you model. However: There is a problem if the user enters a value that cannot be written to model due to value conversion errors. Let’s start with a simple sample:

  • A TextBox is bound to a numeric Age property of your model.
  • As soon as the user enters a value in the Textbox, the property on the model is updated. The model then validates whether the entered value is valid (range from 1 to 130 years).
  • However: If the user enters a string rather than a number (e.g. “30a”), the value conversion to an integer fails. In this case, WPF does not show an error at all:

image


Karl Shifflet recently updated his article on this very subject, where he outlines an MVVM-based approach to the problem (highly recommended reading material!).

In my case, however, I was looking for a simpler solution. I had validation and views already in place and just wanted a visual representation of invalid input that cannot be bound to the model.


WPF Validation Rules to the Rescue

And this is where the good old WPF Validation Rules come back into play:

  1. A binding with ValidatesOnDataErrors=True ensures that the model validation logic is being invoked.
  2. Additional WPF Validation Rules take care of invalid input that can not be bound to the model.


<TextBox x:Name="txtAge">

  <TextBox.Text>
    <Binding Path="Age" ValidatesOnDataErrors="True">
      <Binding.ValidationRules>
        <rules:NumericRule />
      </Binding.ValidationRules>
    </Binding>
  </TextBox.Text>

</TextBox>


That’s it already! An invalid numeric value (below minimum, above maximum) is handled by the model, everything else is caught be the NumericRule (see attached sample for the sources).

image


Simplify Markup 1: Attached Properties

The above sample has one catch - it forces me to write rather verbose XAML. This is where attached properties come to the rescue. Here’s the same thing using an attached property:


<TextBox x:Name="txtAge"
  Text="{Binding Path=Age, ValidatesOnDataErrors=True}"
  rules:Editors.TextRule="{StaticResource numericRule}"
/>


In the sample above, I declared an attached property of type ValidationRule that points to by custom rule. However, depending on your case, you can make your attached property as simple/complex as you need. A great article on this subject was published by WPF master Josh Smith on CodeProject, where he outlines this exact pattern.


Simplify Markup 2: Custom Binding Classes

As an alternative to attached properties - especially in case you want to define multiple parameters - a custom binding expression might be a simpler approach. If you use a simple Decorator helper class, creating your custom binding class is a breeze:


<TextBox x:Name="txtCustomBinding"
  Text="{local:RuleBinding Path=Age, MinValueOverride=20}"
/>


Here’s my custom binding class, derived from BindingDecoratorBase:

using System;
using System.Windows.Controls;
using System.Windows.Data;
using Hardcodet.Wpf.ValidationRules;

namespace Hardcodet.Wpf.CustomBinding
{
  /// <summary>
  /// A binding extension that checks for a given
  /// numeric value.
  /// </summary>
  public class RuleBinding : BindingDecoratorBase
  {
    /// <summary>
    /// An optional override for the minimum value,
    /// that can be used to narrow the allowed range.
    /// </summary>
    public int? MinValueOverride { get; set; }

    /// <summary>
    /// Creates a new instance of the binding with default values.
    /// </summary>
    public RuleBinding()
    {
      //set default binding directives
      ValidatesOnDataErrors = true;
      UpdateSourceTrigger = UpdateSourceTrigger.PropertyChanged;
    }

    /// <summary>
    /// This method is being invoked during initialization.
    /// </summary>
    /// <param name="provider">Provides access to the bound items.</param>
    /// <returns>The binding expression that is created by
    /// the base class.</returns>
    public override object ProvideValue(IServiceProvider provider)
    {
      //create the validation rule
      ValidationRule rule;
      if (MinValueOverride.HasValue)
      {
        //create a rule that also narrows the minimum value
        rule = new MinNumericRule() {MinValue = MinValueOverride.Value};
      }
      else
      {
        //just make sure the value is numeric
        rule = new NumericRule();
      }

      Binding.ValidationRules.Add(rule);

      //delegate binding creation etc. to the base class
      object val = base.ProvideValue(provider);
      return val;
    }
  }
}


The attached sample shows you all the techniques I described above.

Download sample project: validationrules.zip

kick it on DotNetKicks.com

Tags: ,