Archive

Archive for the ‘WPF TreeView’ Category

Organizing Heterogeneous Data on a WPF TreeView

December 11th, 2008

Most WPF TreeView samples you see on the web are somewhat simplistic: While they may provide heterogeneous data, usually all childs of a given node are of the same type:

simpletree

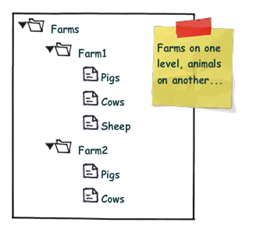
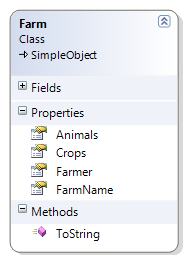
However, more often than not, you’re running into more complex scenarios where additional structuring is necessary. Image your Farm class looks like this:

image

Accordingly, you might want to display that information according to the sketch below:

complextree

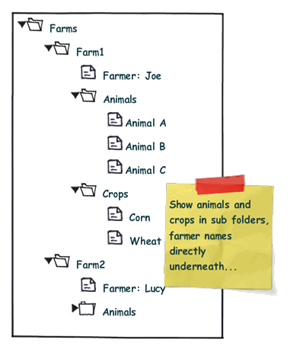
Note the difference: We want to organize the Animals and Crops collections within individual sub folders, while the "Farmer" node is a direct child of the "Farm" root node. From the control’s point of view, this means that the "Folder" nodes and the "Farmer" node are siblings.

Now, one solution to that very problem are ViewModel wrapper classes that optimize the business logic for your specific UI logic. This route does work very well for quite a few scenarios. However, sometimes, you just want to have a quick solution. I’ll try to provide one here…

My solution to that very problem requires the following ingredients:

  • A MultiBinding that allows you to combine different bindings.
  • A converter that helps us organizing the different bound collections into sub folders, where necessary.
  • And of course: Data templates that provide a visual representation of your bound data.


Let’s start with the bindings, which are declared within a HiearchicalDataTemplate. You can use a MultiBinding to retrieve all necessary data of a given Farm instance:


<HierarchicalDataTemplate DataType="{x:Type local:Farm}">

  <!-- bind the different data sources -->
  <HierarchicalDataTemplate.ItemsSource>
    <MultiBinding>
      <Binding Path="Farmer" />
      <Binding Path="Animals" />
      <Binding Path="Crops" />
    </MultiBinding>
  </HierarchicalDataTemplate.ItemsSource>

  <TextBlock Text="{Binding Path=FarmName}" />

</HierarchicalDataTemplate>


A MultiBinding always needs a converter of type IMultiValueConverter. Our converter has to provide the following functionality:

  • Allow binding of simple objects (Farmer), or collections (Animals, Crops).
  • Where necessary, put a bound child item or collection into a virtual container object that can serve as a "folder" when it comes to rendering.
  • Provide means to name (or even identify) a folder in order to simplify styling.
  • Render specific child items directly under the parent node (no subfolder). 
  • Return everything as a an object that can be bound to the TreeView.ItemsSource property.


I wrote a simple converter that performs these tasks. The initial declaration looks like this:

 
<MultiBinding Converter="{StaticResource folderConverter}">
  <Binding Path="Farmer" />
  <Binding Path="Animals" />
  <Binding Path="Crops" />
</MultiBinding>
 
…and it produces the following output:

image


Obviously, the data is being parsed parsed and assigned to the "Farm" nodes, but we’re still lacking the desired structure (sub folders for animals and plants). However, this can easily be done by setting the ConverterParameter property:


<MultiBinding Converter="{StaticResource folderConverter}"
              ConverterParameter=", Animals, Cultivated Plants">
  <Binding Path="Farmer" />
  <Binding Path="Animals" />
  <Binding Path="Crops" />
</MultiBinding>
 

The converter parameter allows you to define folders for any of the items that are bound within the MultiBinding, while an empty string inserts a bound item directly under the root item. The converter parameter above produces the following output:

 image


The tree now renders the farmers and four FolderItem instances. FolderItem is a very simple helper class that is used by the converter to store the bound Animals and Crops collections. It provides just two properties:

  • Name (the string that was defined through the converter parameter)
  • Items (the folder’s contents)

Currently, the tree does not know yet how to render a FolderItem class, which is why there’s just the name displayed. What’s missing here is an additional data template for FolderItem:


<!-- data template for FolderItem instances -->
<HierarchicalDataTemplate DataType="{x:Type vm:FolderItem}"
                          ItemsSource="{Binding Path=Items}">

  <TextBlock Text="{Binding Path=Name}" />

</HierarchicalDataTemplate>


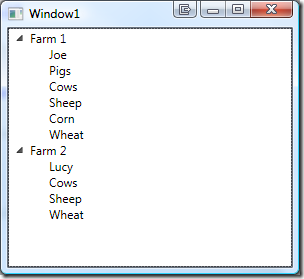
This finally produces our desired output:

image


Simply delegating data organization to the SimpleFolderConverter allows us to individually structure heterogeneous data for our TreeView control with a very simplistic approach. Below is the complete XAML for the sample:


<Window
  x:Class="Hardcodet.Farms.Window1"
  xmlns="http://schemas.microsoft.com/winfx/2006/xaml/presentation"
  xmlns:x="http://schemas.microsoft.com/winfx/2006/xaml"
  xmlns:vm="clr-namespace:Hardcodet.Farms.ViewModel"
  xmlns:local="clr-namespace:Hardcodet.Farms.Model"
  Title="Window1"
  Height="300"
  Width="300">

  <Window.Resources>
    <vm:SimpleFolderConverter x:Key="folderConverter" />

    <!-- data template for Farm instances -->
    <HierarchicalDataTemplate DataType="{x:Type local:Farm}">

      <!-- bind the different data sources -->
      <HierarchicalDataTemplate.ItemsSource>
        <MultiBinding Converter="{StaticResource folderConverter}" 
                      ConverterParameter=", Animals, Cultivated Plants">
          <Binding Path="Farmer" />
          <Binding Path="Animals" />
          <Binding Path="Crops" />
        </MultiBinding>
      </HierarchicalDataTemplate.ItemsSource>

      <TextBlock Text="{Binding Path=FarmName}" />
    </HierarchicalDataTemplate>


    <!-- data template for FolderItem instances -->
    <HierarchicalDataTemplate DataType="{x:Type vm:FolderItem}"
                              ItemsSource="{Binding Path=Items}">
      <TextBlock Text="{Binding Path=Name}" />
    </HierarchicalDataTemplate>

  </Window.Resources>

  <!-- the treeview control -->
  <TreeView x:Name="farmsTree" />
  
</Window>


Of course, you can easily style any of the data templates to your liking. You find the complete sample under the link below. Enjoy 🙂

Download Sample Project (VS2008): farmtree.zip

Author: Categories: WPF, WPF TreeView Tags: ,

WPF TreeView Update

April 7th, 2008

I’ve posted an update for my WPF TreeView which contains a bugfix and two new features:

  • The root item collection is now monitored for changes, and the tree updates itself automatically. This behaviour, however, can be controlled through the ObserveRootItems dependency property.
  • Built-in filtering support through a strongly typed predicate. I’m not completely happy with my implementation though – as a matter of fact, I’ve already started to rewrite it completely – you can expect the next version within the next 10 days. The filtering API however, will remain intact.

In case you did override some of the tree’s virtual methods, your project might not compile out of the box because some of these methods now receive additional parameters. However, as nothing has been removed, adjusting your code should be a matter of seconds.

I’ve added the download link to the original post:
http://www.hardcodet.net/2008/01/wpf-treeview

Happy coding 🙂

Author: Categories: Open Source, WPF TreeView Tags: , ,

Preventing WPF TreeView items from being selected

March 6th, 2008

If you have a WPF TreeView control that shows nested data, and you don’t want the user to select nodes that contain child nodes, you can solve this declaratively as TreeViewItem provides all we need:

  • HasItems dependency property (bool)
  • Focusable dependency property (bool)

As both properties have the same type, you can use a binding expression (needs inversion of the boolean), or just use a trigger. Here’s the trigger:


<!-- root items can only be expanded, not selected -->
<Trigger Property="HasItems"
         Value="true">
  <Setter Property="Focusable"
          Value="false" />
</Trigger>


tree_dialogik
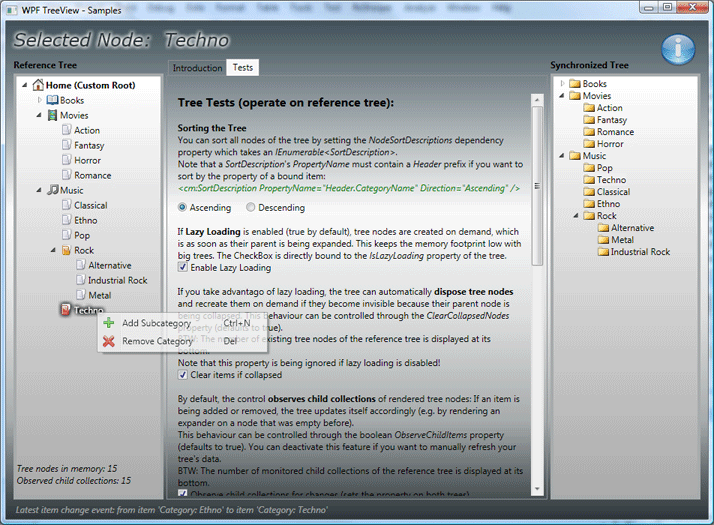
With this trigger in place, simply clicking on a node that contains child items does not change the tree’s current selection, while expanding/collapsing still works.

A common scenario for such a behavior is a tree that contains nodes which are used for grouping purposes only as in the example screenshot.

Author: Categories: WPF, WPF Controls, WPF TreeView Tags: ,

Programmatically filtering the WPF TreeView

February 12th, 2008

There will be filtering and multi selection support in the next iteration of my WPF TreeView, but based on a request on the Code Project forum, I decided to implement a simple filtering mechanism on the current version.

First of all, you can provide filtering without even touching the control base class by just applying the filter in your implementation of the abstract GetChildItems method. This method would effectively filter all items of the sample tree:

//returns subcategories that should be available through the tree
public override ICollection<ShopCategory>
                           GetChildItems(ShopCategory parent)
{
  //create a filtered list
  List<ShopCategory> list = new List<ShopCategory>();
  foreach(ShopCategory category in parent.SubCategories)
  {
    if ( ... ) list.Add(category);
  }
  
  return list;
}

In order to have the tree react to changed filter conditions, calling the tree’s Refresh() method takes care of everything.

This approach is dead simple, and it has the advantage that only items that are supposed to be accessible on the tree are being processed by the control. On the other hand, it also means that you would have to recreate the tree every time the tree’s filter changes.


In order to provide an alternative, I also looked at filtering the tree on the UI level (filtering == just hide the filtered nodes). The following sample sample operates on the tree implementation of the sample application, and provides a property of type Predicate<ShopCategory>. In order to get it working, I needed to do 3 things:

  • Apply the filter for new nodes that are being created
  • Run the filter if a node is being expanded
  • Refresh the tree if the filter is being set


I must say I’m quite satisfied – as the control provides me with virtual methods to intercept everything, the whole thing took about 2 minutes to set up 🙂


private Predicate<ShopCategory> filter = null;


/// <summary>
/// Defines a filter for items that are bound to the tree. Set to
/// null in order to disable filtering.
/// </summary>
public Predicate<ShopCategory> Filter
{
  get { return filter; }
  set
  {
    filter = value;

    //recreate the tree in order to apply the filter on
    //all currently visible nodes
    //-> of course, this could be optimized, but it does the job
    Refresh(GetTreeLayout());
  }
}


/// <summary>
/// Applies the filter on all child nodes.
/// </summary>
/// <param name="treeNode"></param>
protected override void OnNodeExpanded(TreeViewItem treeNode)
{
  //make sure child nodes are being created
  base.OnNodeExpanded(treeNode);

  //apply filter
  foreach (TreeViewItem childNode in treeNode.Items)
  {
    ApplyFilter(childNode, (ShopCategory)childNode.Header);
  }
}


/// <summary>
/// Immediately applies the filter on newly created items. This
/// is somewhat redundant (as we're also handling <see cref="OnNodeExpanded"/>),
/// but ensures we also consider root nodes.
/// </summary>
/// <param name="item"></param>
/// <returns></returns>
protected override TreeViewItem CreateTreeViewItem(ShopCategory item)
{
  //delegate node creation to base class
  TreeViewItem node = base.CreateTreeViewItem(item);

  //apply the filter and return the node
  ApplyFilter(node, item);
  return node;
}


/// <summary>
/// Filters categories if the <see cref="Filter"/> property
/// is set by simply setting the <see cref="TreeViewItem.Visibility"/>
/// property to <see cref="Visibility.Collapsed"/> if the item does
/// not match the filter.
/// </summary>
private void ApplyFilter(TreeViewItem node, ShopCategory item)
{
  bool visible = filter == null || filter(item);
  node.Visibility = visible ? Visibility.Visible : Visibility.Collapsed;
}


You can try it out by adding the above code to the sample tree (CategoryTree.cs), and setting the Filter property in an event handler of the sample app. Note that OnNodeExpanded is already overridden, so you’ll end up with two duplicate methods if you paste in the snippet.

Author: Categories: WPF TreeView Tags: ,

A versatile WPF TreeView control

January 24th, 2008

A tutorial is now available on Code Project, so check the article for a detailed overview. And please leave your rating if you like the control 🙂
http://www.codeproject.com/KB/WPF/versatile_treeview.aspx

Update: The latest version is currently only available through the download link below. I’ll update the CodeProject article once the current filtering mechanism has been rewritten:

Download: wpf-treeview.zip (Current version: 1.0.7, updated 2008.04.06)

TreeView example This is a little something I’ve been working on for a while: A replacement (or better: enhancement) of WPF’s built-in TreeView control.

I became aware of the default control’s limitations during my last project – I naturally started with hierarchical data templates, but was soon confronted with quite a few issues: I missed a simple API to control the tree, and styling of the tree’s nodes proved hard as well. Furthermore, WPF’s TreeView tends to fire all sorts of SelectedItemChanged events if it’s being refreshed or rebound, which caused side-effects with TwoWay data binding.

However, instead of posting a rant that probably nobody would ever read (let alone care about), I worked on an alternative. Here’s the tree’s main features at a glance:

  • Simple declaration:
    <local:ProductTree x:Name="MyTree"
                       Items="{Binding Source={StaticResource Shop},
                              Path=Products}"
                       SelectedItem="{Binding ElementName=MyProductList,
                              Path=ActiveItem, Mode=TwoWay}"
                       NodeContextMenu="{StaticResource CategoryMenu}"
                       TreeNodeStyle="{StaticResource SimpleFolders}"
                       TreeStyle="{StaticResource SimpleTreeStyle}"
                       SelectedItemChanged="OnSelectedItemChanged"
    />
  • Simple and type safe API:
    //bind flat list of business objects to tree
    List<Product> products = GetProducts();
    myTree.Items = products;
    
    //select a given item
    Product foo = GetBestSellingProduct();
    myTree.SelectedItem = foo; 
    
    //SelectedItem is of type Product - no casts required
    Product bar = myTree.SelectedItem;
  • Lazy loading support – does not create tree nodes until the parent node is expanded. Also provides the option to automatically clear invisible tree nodes. This allows either virtualized trees in case getting data is expensive, or low memory trees that keep the number of tree nodes at a minimum.
  • Simple sorting.
  • Convenient context menu handling for tree nodes
  • Optional root node which is not dependent on the tree’s bound items
  • Simple styling on every level: Tree, TreeViewItem, or bound items (via DataTemplates).
  • Tree layout can be cached, saved and reapplied.
  • Access to tree nodes (TreeViewItem) through bound items.
  • AutoCollapse feature / ExpandAll / CollapseAll methods

All this goodness comes at a price: The TreeViewBase class that provides this functionality, is abstract. This means you have to write a little code yourself. However, you’ll probably manage with 3 lines of code, as the base control just needs to know 3 things:

  • How to generate an identifier for a given tree node
  • How to access a bound item’s childs, if there are any
  • How to access a bound item’s parent, if there is one

Here’s the complete implementation of the sample application’s tree control:

//a tree control that handles only ShopCategory objects
public class CategoryTree : TreeViewBase<ShopCategory>
{

  //the sample uses the category's name as the identifier
  public override string GetItemKey(ShopCategory item)
  {
    return item.CategoryName;
  }

  //returns subcategories that should be available through the tree
  public override ICollection<ShopCategory>
                             GetChildItems(ShopCategory parent)
  {
    return parent.SubCategories;
  }

  //get the parent category, or null if it's a root category
  public override ShopCategory GetParentItem(ShopCategory item)
  {
    return item.ParentCategory;
  }

I’m planning to write a CodeProject article for this one, but for now, it’s only available through my place without a tutorial. However: The library comes with a sample project that shows pretty much all features of the control. Project format is currently VS2008 only, but binaries which target .NET 3.0 are included. Enjoy!

Sample Application