Archive

Archive for April, 2009

Declaring Custom WPF Commands via MarkupExtensions

April 25th, 2009

And yet another markup extension that hopefully makes things a little easier for you. Basically, it’s the same pattern that the good doctor described here for value converters, but with custom commands in mind.

Without Extension

Basically, this extension makes your commands immediately available without having to declare them. One "traditional" way to declare a command is directly in XAML:

<Window.Resources>

  <cmd:HelloWorldCommand x:Key="SayHello" />

</Window.Resources>


…and then apply it like this:

<Button Command="{StaticResource SayHello}" />


Using the Markup Extension

The declaration part above can become somewhat tedious, especially if you have quite a few commands (e.g. because you are using a ribbon with lots of buttons on it). Thanks to using a markup extension, you can skip the declaration part altogether and just declare your command.

<Button Command="{cmd:HelloWorldCommand}" />


Implementation and Sample


/// <summary>
/// Basic implementation of the <see cref="ICommand"/>
/// interface, which is also accessible as a markup
/// extension.
/// </summary>
public abstract class CommandExtension<T> : MarkupExtension, ICommand
    where T:class, ICommand, new()
{
  /// <summary>
  /// A singleton instance.
  /// </summary>
  private static T command;


  /// <summary>
  /// Gets a shared command instance.
  /// </summary>
  public override object ProvideValue(IServiceProvider serviceProvider)
  {
    if (command == null) command = new T();
    return command;
  }


  /// <summary>
  /// Fires when changes occur that affect whether
  /// or not the command should execute.
  /// </summary>
  public event EventHandler CanExecuteChanged
  {
    add { CommandManager.RequerySuggested += value; }
    remove { CommandManager.RequerySuggested -= value; }
  }
  

  /// <summary>
  /// Defines the method to be called when the command is invoked.
  /// </summary>
  /// <param name="parameter">Data used by the command.
  /// If the command does not require data to be passed,
  /// this object can be set to null.
  /// </param>
  public abstract void Execute(object parameter);


  /// <summary>
  /// Defines the method that determines whether the command
  /// can execute in its current state.
  /// </summary>
  /// <returns>
  /// This default implementation always returns true.
  /// </returns>
  /// <param name="parameter">Data used by the command.  
  /// If the command does not require data to be passed,
  /// this object can be set to null.
  /// </param>
  public virtual bool CanExecute(object parameter)
  {
    return true;
  }
}


…and here’s a sample implementation:

public class HelloWorldCommand : CommandExtension<HelloWorldCommand>
{
  public override void Execute(object parameter)
  {
    MessageBox.Show("Hello world.");
  }
}


Of course, nothing prevents you from pimping the base class a little to your needs 🙂

Author: Categories: WPF Tags: ,

A Façade for Simple and Framework-Independent Logging in .NET

April 23rd, 2009

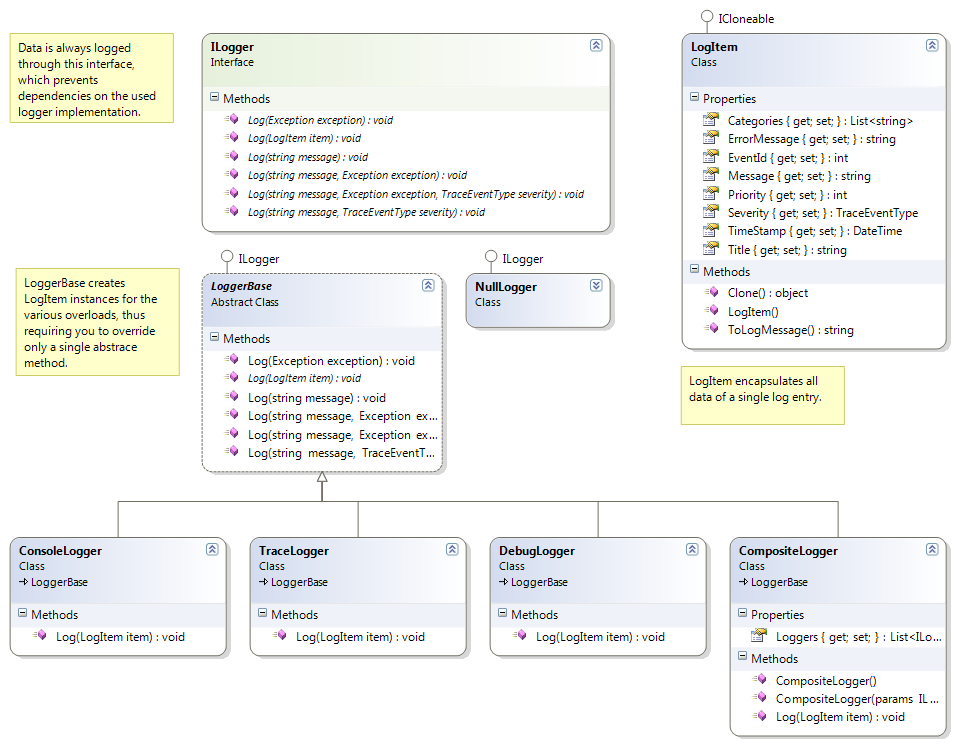
Logging is an important aspect, but I don’t like to have dependencies on a specific logging framework all over the place. This is where a logging façade comes in handy. Basically, a façade just provides you with a common interface that decouples the used logging framework from your code:


//ILogger is the facade. Behind the scenes,
//a framework of your choice is used
ILogger logger = LoggerService.Logger;
logger.Log("hello world");


The idea of a logging façade isn’t exactly new, but I thought I’d share this one with you for a few reasons:

  • It is dead easy to use.
  • It provides quite a few overloads when it comes to logging.
  • The core library has no dependencies on other libraries at all.
  • There are two façades (separate DLLs) that log through the Enterprise Library Logging block or the BitFactory logger. And hopefully more to come!
  • Writing your own façade is as simple as overriding one single method.
  • It’s not part of another project (completely standalone), and there is no license attached to it. Do with it whatever you want.
  • It is dead easy to use.


image

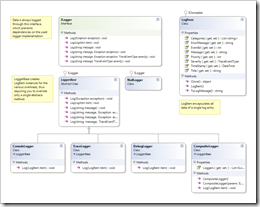
(click on image to enlarge)


Here’s one way to create a file-based logger (using the BitFactory façade) and make it globally accessible. This only takes you a few lines of code:

//create a new logger instance
string file = @"C:logfile.txt";
ILogger logger = BitFactoryLogger.CreateSingleFileLogger(file);

//use the global LoggerService to store the logger
LoggerService.SetLogger(logger);


...


//this will store the info in the log file
LoggerService.Logger.Log("This is an information");


Logging via ILogger

The whole purpose of this project is to shield your libraries from the actually chosen logging framework. Accordingly, you are always logging through the ILogger instance. ILogger provides quite a few overloads of the Log method, here are a few of them:


public void LogData(ILogger logger)
{
  logger.Log("An information");
  logger.Log("Something Happened", TraceEventType.Warning);

  //LogItem is the most verbose version
  LogItem item = new LogItem();
  item.Message = "My Message";
  item.EventId = 999;
  item.Categories.Add("Foo");
  item.Priority = 10;
  logger.Log(item); 

  try
  {
    DivideByZero();
  }
  catch(Exception e)
  {
    logger.Log(e);
    logger.Log("Additional message.", e);
    logger.Log("Additional message.", e, TraceEventType.Critical);
  } 
}


Initializing an ILogger Implementation

During the initialization of your application, you will have to specify the the logger implementation that is supposed to be used. This might happen declaratively or directly in code. Here’s the initialization code from NetDrives, which makes a logger available through the AutoFac IOC container.

Note that I’m registering a ConsoleLogger for debug builds, while release builds write into a log file. These are completely different classes, but it doesn’t matter – they both implement the ILogger interface:


//init IOC container builder
var builder = new ContainerBuilder();

//register single logger instance
ILogger logger;

#if (DEBUG)
  logger = new ConsoleLogger();
#else
  logger = BitFactoryLogger.CreateSingleFileLogger(AppUtil.LogFile);
#endif

//register logger
builder.Register(logger).As<ILogger>();


Registration and Access through LoggerService

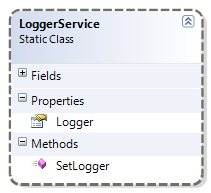
I prefer to initialize and access my logger through an IOC container, but you can do it however you like. If you’re lacking a place to make your ILogger globally accessible, you can use the static LoggerService class:

 image


public void InitApp()
{
  //create a file logger (use BitFactory facade)
  string logFile = @"C:MyLogFile.txt";
  ILogger logger = BitFactoryLogger.CreateSingleFileLogger(logFile);

  //register as globally used logger
  LoggerService.SetLogger(logger);
}


private void Foo()
{
  try
  {
    DoSomethingWrong();
  }
  catch(Exception e)
  {
    //get registered logger and log exception
    ILogger logger = LoggerService.Logger;
    logger.Log(e);
  }
}


A nice thing about LoggerService: It guarantees you always a valid ILogger instance. If no logger is set, it just falls back to a NullLogger implementation that does not create any output at all. Here’s the implementation:


namespace Hardcodet.Util.Logging
{
  /// <summary>
  /// Provides a global repository for a given <see cref="ILogger"/>
  /// instance. This class ensures that the <see cref="Logger"/>
  /// property is never nullo - in case no logger is defined, it
  /// automatically installs a <see cref="NullLogger"/>
  /// instance.
  /// </summary>
  public static class LoggerService
  {
    private static ILogger logger = new NullLogger();


    /// <summary>
    /// Gets the installed <see cref="ILogger"/> implementation.
    /// </summary>
    /// <remarks>This property always returns a valid
    /// logger.</remarks>
    public static ILogger Logger
    {
      get { return logger; }
    }


    /// <summary>
    /// Installs a given logger or resets the <see cref="Logger"/>
    /// to a <see cref="NullLogger"/> instance if the
    /// <paramref name="loggerImplementation"/> is a null
    /// reference.
    /// </summary>
    /// <param name="loggerImplementation">The logger to be
    /// used globally, or a null reference in order to reset
    /// the service.</param>
    public static void SetLogger(ILogger loggerImplementation)
    {
      logger = loggerImplementation ?? new NullLogger();
    }
  }
}


Creating a new Logger Façade

In case you want to use another logging framework (e.g. NLog or Log4Net), creating a new façade is very easy. Basically, you create a new project, set a reference to the base library and write a class that either

  • implements ILogger directly
  • or, even simpler, derives from the abstract LoggerBase class.


Feel like sharing your own façade? Just contact me and I’ll happily include your implementation 🙂


As a sample, here’s the code of the ConsoleLogger (part of the core library) and the Enterprise Library façade:


using System;

namespace Hardcodet.Util.Logging
{
  /// <summary>
  /// A very simple implementation of <see cref="ILogger"/>
  /// that outputs all messages to the system console.
  /// </summary>
  public class ConsoleLogger : LoggerBase
  {
    /// <summary>
    /// Logs a given item to the console.
    /// </summary>
    /// <param name="item">The item to be logged.</param>
    /// <exception cref="ArgumentNullException">If <paramref name="item"/>
    /// is a null reference.</exception>
    public override void Log(LogItem item)
    {
      if (item == null) throw new ArgumentNullException("item");
      Console.Out.WriteLine(item.ToLogMessage());
    }

  }
}


using Microsoft.Practices.EnterpriseLibrary.Logging;


namespace Hardcodet.Util.Logging.EntLibFacade
{
  /// <summary>
  /// An implementation of the <see cref="ILogger"/>
  /// interface which outputs logged data using
  /// the <see cref="Logger"/> of the MS Enterprise
  /// Library.
  /// </summary>
  public class EnterpriseLibraryLogger : LoggerBase
  {

    /// <summary>
    /// Writes a log entry to the Enterprise Library's
    /// logging block. Output depends on the logging
    /// block's configuration.
    /// </summary>
    /// <param name="item">An log item which encapsulates
    /// information to be logged.</param>
    public override void Log(LogItem item)
    {
      LogEntry entry = ConvertLogItem(item);
      Logger.Write(entry);
    }


    /// <summary>
    /// Creates a <c>LogEntry</c> instance which can be processed
    /// by the Enterprise Library based on a given log item. 
    /// </summary>
    /// <param name="item">An log item which encapsulates information
    /// to be logged.</param>
    /// <returns>An Enterprise Library item which corresponds
    /// to the submitted <c>LogItem</c>.</returns>
    private static LogEntry ConvertLogItem(LogItem item)
    {
      //assign properties
      LogEntry entry = new LogEntry();
      entry.Message = item.Message;
      entry.Title = item.Title;
      entry.AddErrorMessage(item.ErrorMessage);
      entry.EventId = item.EventId;
      entry.Priority = item.Priority;
      entry.Severity = item.Severity;
      entry.TimeStamp = item.TimeStamp;

      foreach (string category in item.Categories)
      {
        item.Categories.Add(category);
      }
      
      return entry;
    }
 
  }
}


The download contains the core library, two external façades (BitFactory, Enterprise Library), and a sample project. Hope you’ll like it 🙂

hardcodet-logging.zip

Author: Categories: C#, Open Source Tags:

Quick and Dirty (but nice!) ToolTips via Markup Extensions

April 19th, 2009

Note: There’s a follow-up posting to that one that relies on Blend Behaviors.


NetDrives does not rely on styles when it comes to displaying ToolTips, but uses a simple markup extension, that provides the following functionality:

  • Displays a nice looking ToolTip rather than just plain text.
  • Optional lookup of strings in a resource dictionary to simplify localization.
  • Optional title text.
  • Very simple declaration.

Here’s what the XAML looks like:

<Image
  Source="..SharedImagesHelpSmall.png"
  ToolTip="{ext:Info Title=ShareNameTitleToolTip, Body=ShareNameInfoToolTip}"
  />


…and this is the output:

image

Creating the Popup Control

The first step is to create a simple control that contains the ToolTip. Basically, this is a simple UserControl with the following features:

  • A grid with two rows. The first row contains just the title and is auto-sized to make sure it collapses if the title is not used at all.
  • Two TextBlocks for title and body text.
  • An image (I didn’t make that one bindable, I always use the same one).
  • Two dependency properties that provide binding capabilities for header and body text.

Here’s what the control looks like in Blend:

image

Of course, you can easily use this user control through styles and/or directly declared in XAML whenever you need:

<Image Source="..SharedImagesHelpSmall.png">
  <Image.ToolTip>
    <MyToolTipControl Header="My Title" Body="This is a ToolTip" />
  </Image.ToolTip>
</Image>

However, this would still take a style to hide the tooltip border and you are lacking resource file lookups. The markup extension makes this way easier…

Implementing the Markup Extension

MarkupExtension is one of the lesser known stars in WPF – it requires a little coding, but once in place, it greatly simplify things for you. A simple yet brilliant example is Dr. WPF’s ValueConverter extension, and I already blogged a few times about other applications.

This Info markup extension basically provides the following:

  • Two properties (Title and Body)
  • Resource lookup with fallback mechanism (string is used directly if it’s not a resource key)
  • ToolTip creation


/// <summary>
/// A markup extension that returns a
/// <see cref="InfoPopup"/> control preconfigured
/// with header and text information according to the
/// <see cref="Title"/> and <see cref="Body"/>
/// properties.
/// </summary>
public class Info : MarkupExtension
{
  /// <summary>
  /// Either a title text or a resource key that can be used
  /// to look up the title.
  /// </summary>
  public string Title { get; set; }

  /// <summary>
  /// Either a tooltips' main text or a resource key that can be used
  /// to look up the text.
  /// </summary>
  public string Body { get; set; }

  /// <summary>
  /// Empty default constructor.
  /// </summary>
  public Info()
  {
  }

  /// <summary>
  /// Inits the <see cref="Info"/> markup extension
  /// with the title and body.
  /// </summary>
  public Info(string title, string body)
  {
    Title = title;
    Body = body;
  }

  /// <summary>
  /// Performs a lookup for the defined <see cref="Title"/> and
  /// <see cref="Info"/> and creates the tooltip control.
  /// </summary>
  /// <returns>
  /// A tooltip control.
  /// </returns>
  public override object ProvideValue(IServiceProvider serviceProvider)
  {
    //create the user control that 
    InfoPopup popup = new InfoPopup();

    if (!String.IsNullOrEmpty(Title))
    {
      //look up title - if the string is not a
      //resource key, use it directly
      var result = Resources.ResourceManager.GetObject(Title) ?? Title;
      popup.HeaderText = (string)result;
    }

    if (!String.IsNullOrEmpty(Body))
    {
      //look up body text - if the string is not a
      //resource key, use it directly
      var result = Resources.ResourceManager.GetObject(Body) ?? Body;
      popup.BodyText = (string)result;
    }

    //create tooltip and make sure only the content is visible
    ToolTip tt = new ToolTip();
    tt.HasDropShadow = false;
    tt.BorderThickness = new Thickness(0);
    tt.Background = Brushes.Transparent;
    tt.Content = popup;

    return tt;
  }
}

Conclusion and Sample

This is only one of several ways to tackle the problem, but I really like that it only takes a single line to have a rich ToolTip in place. The implementation provided here may not completely suit your requirements, but it can easily be tailored to your needs.

The link below points to a sample project that contains both the markup extension and ToolTip control. Enjoy 🙂

tooltip-extension.zip


kick it on DotNetKicks.com

WPF Ribbon: RibbonCommands Can Cause Memory Leaks

April 15th, 2009

I stumbled over an issue when dealing with Microsoft’s WPF ribbon today. Apparently, the control that heavily relies on RibbonCommands rather than arbitrary ICommand instances may cause severe memory leaks. Have a look at this simple Window:


<Window ...>
  <Grid>
    <Grid.Resources>
      <r:RibbonCommand
        x:Key="MyCommand"
        Executed="OnRibbonClicked"
        LabelTitle="Click Me" />
    </Grid.Resources>

    <!-- a ribbon that only displays a command in the quick access toolbar -->
    <r:Ribbon>
      <r:Ribbon.QuickAccessToolBar>
        <r:RibbonQuickAccessToolBar>
          <r:RibbonButton
            Command="{StaticResource MyCommand}"
            r:RibbonQuickAccessToolBar.Placement="InToolBar" />
        </r:RibbonQuickAccessToolBar>
      </r:Ribbon.QuickAccessToolBar>
    </r:Ribbon>
  </Grid>
</Window>


…and here’s the event listener that was declared for the RibbonCommand:

private void OnRibbonClicked(object sender, ExecutedRoutedEventArgs e)
{
  MessageBox.Show("Ribbon command executing.");
}


Once opened and closed, this window will not be garbage collected until the application shuts down. The reason is the OnRibbonClicked event handler that doesn’t get deregistered.

There are signs that Microsoft will dump RibbonCommand completely once the ribbon goes live. However: This probably won’t happen too fast, so you will have to solve the issue on your own. On the bright side: It forces a cleaner design on you.

I prefer custom commands anyway, so the natural way to go was to simply implement my own class that derives from RibbonCommand:


///<summary>
/// Base class for custom <see cref="RibbonCommand"/>
/// implementations.
///</summary>
public abstract class RibbonCommandBase : RibbonCommand
{
  /// <summary>
  /// Creates the command and registers weak event listeners.
  /// </summary>
  protected RibbonCommandBase()
  {
    Executed += OnExecute;
    CanExecute += OnCanExecute;
  }


  /// <summary>
  /// Determines whether the command can be executed or not.
  /// The default implementation always allows that.
  /// </summary>
  protected virtual void OnCanExecute(object sender, CanExecuteRoutedEventArgs e)
  {
    e.CanExecute = true;
  }


  /// <summary>
  /// Command implementation - executes command logic.
  /// </summary>
  protected abstract void OnExecute(object sender, ExecutedRoutedEventArgs e);
}


The noteworthy thing here is that this abstract base class registers event listeners for its own events – one virtual, one abstract. Accordingly, a deriving command implementation only has to provide its own OnExecute and OnCanExecute (optional) methods to get going:


public class MessageCommand : RibbonCommandBase
{
  protected override void OnExecute(object sender, ExecutedRoutedEventArgs e)
  {
    MessageBox.Show("Ribbon command executing.");
  }
}


The last thing to correct is the command declaration in XAML – rather than declaring a RibbonCommand with a code-behind event listener, you declare your custom command (MessageCommand in the sample below). As you can see, there is no longer a listener for the Executed event – the command takes care of this on its own. Accordingly, this command can be declared in a resource dictionary without a code-behind file.

<!-- Custom command - can be declared in a resource dictionary -->
<cmd:MessageCommand x:Key="MyCommand"
                    LabelTitle="Click Me"
                    SmallImageSource="About.png"
/>


Sample Project

The attached sample project shows the two variants and the missing garbage collection of the standard ribbon commands.

I wasn’t sure about licensing restrictions, therefore I did not include the WPF ribbon assembly in the downloadable sample – you’ll have to add the reference yourself before compiling. Sorry for the inconvenience :/

Download: ribbon-commands.zip


 image


kick it on DotNetKicks.com

Author: Categories: WPF, WPF Controls Tags: ,

WPF Behavior Samples

April 13th, 2009

Behaviors in WPF and Silverlight are one of the features that were introduced with Blend 3, and unlike attached behaviors, they benefit from full designer support in Blend 3, thus providing a much higher level of accessibility to developers and designers alike.

Laurent Bugnion has posted a great tutorial where he walks you through the various aspects of a magnifying glass behavior, and Jeremiah Morrill generates eye candy through a behavior that adds glass effects to your visuals.

Last but not least, the Expression team created a new section on the Expression Gallery that is dedicated to behaviors. I sure like shiny new toys 😉

Author: Categories: WPF Tags:

String Encryption using DPAPI and Extension Methods

April 12th, 2009

Latest Version: 2009.04.14 (Bugfix in Matches extension method)


The Windows Data Protection API (DPAPI) is a great technology to securely encrypt user or machine specific data without having to worry about an encryption key. Since .NET 2.0, DPAPI is part of the .NET framework, so encrypting data is as easy as this:


public static byte[] Encrypt(byte[] data)
{
  var scope = DataProtectionScope.CurrentUser;
  return ProtectedData.Protect(data, null, scope);
}


As you can see, the Protect method of the ProtectedData class takes binary input and returns a byte array that contains the encrypted data. This means that you’ll have to do some conversions when dealing with strings, and the result of the encryption is a byte array anyway.

NetDrives relies on the DPAPI to encrypt user passwords that are stored on disk. Accordingly, I didn’t want to deal with binary data at all: Both input and output were supposed to be strings, which why I came up with a few extension methods that nicely wrap string encryptions for me:

image


Basic String Encryption

In case in-memory protection is not an issue and you just need to encrypt/decrypt strings (e.g. to store encrypted data in a configuration file), you just need two extension methods. First, in order to encrypt a string, just invoke the Encrypt extension method:

string password = "hello world";
string encrypted = password.Encrypt();


Encrypt returns you the encrypted data, represented as base64 encoded string. In order to get your password back, just invoke the Decrypt extension method:

string plainText = encrypted.Decrypt();


Managed Strings vs. SecureString

The above methods are convenient to encrypt sensitive data that is supposed to be serialized or transmitted in any way. They do, however, not protect data at runtime as the decrypted strings remain in memory. In case this is an issue, you should revert to the SecureString rather than using plain strings (but keep in mind that this may lure you into a false sense of security!).

Accordingly, I also created extension methods that use SecureString instances rather than managed strings and allow you to wrap / unwrap strings quite easily. Here’s a test that shows off the various conversions:

Attention: Always keep in mind that once you are dealing with a managed string (such as the plainText variable below), your code can be compromised! Accordingly, the ToSecureString / Unwrap methods should be treated carefully.


[Test]
public void Encryption_And_Decryption_Cycle_Should_Return_Original_Value()
{
  string plainText = "this is a password";

  //encrypt plain text
  string cipher = plainText.Encrypt();
  Assert.AreNotEqual(plainText, cipher);

  //decrypt cipher into managed string
  string decrypted = cipher.Decrypt();
  Assert.AreEqual(plainText, decrypted);

  //create a SecureString from the plain text
  SecureString plainSecure = plainText.ToSecureString();

  //test unwrapping of a SecureString
  Assert.AreEqual(plainText, plainSecure.Unwrap());

  //encrypt the string that is wrapped into the SecureString
  string cipherFromSecure = plainSecure.Encrypt();
  
  //decrypt the cipher that was created from the the SecureString
  Assert.AreEqual(plainText, cipherFromSecure.Decrypt());
}


Implementation

Here’s the class that provides the extension methods including a few helper methods that facilitate dealing with SecureString (e.g. SecureString.IsNullOrEmpty).

Note that you need to set an assembly reference to the System.Security assembly. Also keep in mind that the class always performs DPAPI encryption with user scope. You might want to provide some additional overloads in order to support encryption that uses the context of the machine rather than the user’s. The same goes for the optional entropy that is not used at all for simplicity.

kick it on DotNetKicks.com


using System;
using System.Collections.Generic;
using System.Linq;
using System.Runtime.InteropServices;
using System.Security;
using System.Security.Cryptography;
using System.Text;

namespace Hardcodet.NetDrives.Platform
{
  /// <summary>
  /// Provides extension methods that deal with
  /// string encryption/decryption and
  /// <see cref="SecureString"/> encapsulation.
  /// </summary>
  public static class SecurityExtensions
  {
    /// <summary>
    /// Specifies the data protection scope of the DPAPI.
    /// </summary>
    private const DataProtectionScope Scope = DataProtectionScope.CurrentUser;


    /// <summary>
    /// Encrypts a given password and returns the encrypted data
    /// as a base64 string.
    /// </summary>
    /// <param name="plainText">An unencrypted string that needs
    /// to be secured.</param>
    /// <returns>A base64 encoded string that represents the encrypted
    /// binary data.
    /// </returns>
    /// <remarks>This solution is not really secure as we are
    /// keeping strings in memory. If runtime protection is essential,
    /// <see cref="SecureString"/> should be used.</remarks>
    /// <exception cref="ArgumentNullException">If <paramref name="plainText"/>
    /// is a null reference.</exception>
    public static string Encrypt(this string plainText)
    {
      if (plainText == null) throw new ArgumentNullException("plainText");

      //encrypt data
      var data = Encoding.Unicode.GetBytes(plainText);
      byte[] encrypted = ProtectedData.Protect(data, null, Scope);

      //return as base64 string
      return Convert.ToBase64String(encrypted);
    }


    /// <summary>
    /// Decrypts a given string.
    /// </summary>
    /// <param name="cipher">A base64 encoded string that was created
    /// through the <see cref="Encrypt(string)"/> or
    /// <see cref="Encrypt(SecureString)"/> extension methods.</param>
    /// <returns>The decrypted string.</returns>
    /// <remarks>Keep in mind that the decrypted string remains in memory
    /// and makes your application vulnerable per se. If runtime protection
    /// is essential, <see cref="SecureString"/> should be used.</remarks>
    /// <exception cref="ArgumentNullException">If <paramref name="cipher"/>
    /// is a null reference.</exception>
    public static string Decrypt(this string cipher)
    {
      if (cipher == null) throw new ArgumentNullException("cipher");

      //parse base64 string
      byte[] data = Convert.FromBase64String(cipher);

      //decrypt data
      byte[] decrypted = ProtectedData.Unprotect(data, null, Scope);
      return Encoding.Unicode.GetString(decrypted);
    }


    /// <summary>
    /// Encrypts the contents of a secure string.
    /// </summary>
    /// <param name="value">An unencrypted string that needs
    /// to be secured.</param>
    /// <returns>A base64 encoded string that represents the encrypted
    /// binary data.
    /// </returns>
    /// <exception cref="ArgumentNullException">If <paramref name="value"/>
    /// is a null reference.</exception>
    public static string Encrypt(this SecureString value)
    {
      if (value == null) throw new ArgumentNullException("value");

      IntPtr ptr = Marshal.SecureStringToCoTaskMemUnicode(value);
      try
      {
        char[] buffer = new char[value.Length];
        Marshal.Copy(ptr, buffer, 0, value.Length);

        byte[] data = Encoding.Unicode.GetBytes(buffer);
        byte[] encrypted = ProtectedData.Protect(data, null, Scope);

        //return as base64 string
        return Convert.ToBase64String(encrypted);
      }
      finally
      {
        Marshal.ZeroFreeCoTaskMemUnicode(ptr);
      }
    }


    /// <summary>
    /// Decrypts a base64 encrypted string and returns the decrpyted data
    /// wrapped into a <see cref="SecureString"/> instance.
    /// </summary>
    /// <param name="cipher">A base64 encoded string that was created
    /// through the <see cref="Encrypt(string)"/> or
    /// <see cref="Encrypt(SecureString)"/> extension methods.</param>
    /// <returns>The decrypted string, wrapped into a
    /// <see cref="SecureString"/> instance.</returns>
    /// <exception cref="ArgumentNullException">If <paramref name="cipher"/>
    /// is a null reference.</exception>
    public static SecureString DecryptSecure(this string cipher)
    {
      if (cipher == null) throw new ArgumentNullException("cipher");

      //parse base64 string
      byte[] data = Convert.FromBase64String(cipher);

      //decrypt data
      byte[] decrypted = ProtectedData.Unprotect(data, null, Scope);

      SecureString ss = new SecureString();

      //parse characters one by one - doesn't change the fact that
      //we have them in memory however...
      int count = Encoding.Unicode.GetCharCount(decrypted);
      int bc = decrypted.Length/count;
      for (int i = 0; i < count; i++)
      {
        ss.AppendChar(Encoding.Unicode.GetChars(decrypted, i*bc, bc)[0]);
      }

      //mark as read-only
      ss.MakeReadOnly();
      return ss;
    }


    /// <summary>
    /// Wraps a managed string into a <see cref="SecureString"/> 
    /// instance.
    /// </summary>
    /// <param name="value">A string or char sequence that 
    /// should be encapsulated.</param>
    /// <returns>A <see cref="SecureString"/> that encapsulates the
    /// submitted value.</returns>
    /// <exception cref="ArgumentNullException">If <paramref name="value"/>
    /// is a null reference.</exception>
    public static SecureString ToSecureString(this IEnumerable<char> value)
    {
      if (value == null) throw new ArgumentNullException("value");

      var secured = new SecureString();

      var charArray = value.ToArray();
      for (int i = 0; i < charArray.Length; i++)
      {
        secured.AppendChar(charArray[i]);
      }

      secured.MakeReadOnly();
      return secured;
    }


    /// <summary>
    /// Unwraps the contents of a secured string and
    /// returns the contained value.
    /// </summary>
    /// <param name="value"></param>
    /// <returns></returns>
    /// <remarks>Be aware that the unwrapped managed string can be
    /// extracted from memory.</remarks>
    /// <exception cref="ArgumentNullException">If <paramref name="value"/>
    /// is a null reference.</exception>
    public static string Unwrap(this SecureString value)
    {
      if (value == null) throw new ArgumentNullException("value");

      IntPtr ptr = Marshal.SecureStringToCoTaskMemUnicode(value);
      try
      {
        return Marshal.PtrToStringUni(ptr);
      }
      finally
      {
        Marshal.ZeroFreeCoTaskMemUnicode(ptr);
      }
    }


    /// <summary>
    /// Checks whether a <see cref="SecureString"/> is either
    /// null or has a <see cref="SecureString.Length"/> of 0.
    /// </summary>
    /// <param name="value">The secure string to be inspected.</param>
    /// <returns>True if the string is either null or empty.</returns>
    public static bool IsNullOrEmpty(this SecureString value)
    {
      return value == null || value.Length == 0;
    }


    /// <summary>
    /// Performs bytewise comparison of two secure strings.
    /// </summary>
    /// <param name="value"></param>
    /// <param name="other"></param>
    /// <returns>True if the strings are equal.</returns>
    public static bool Matches(this SecureString value, SecureString other)
    {
      if (value == null && other == null) return true;
      if (value == null || other == null) return false;
      if (value.Length != other.Length) return false;
      if (value.Length == 0 && other.Length == 0) return true;

      IntPtr ptrA = Marshal.SecureStringToCoTaskMemUnicode(value);
      IntPtr ptrB = Marshal.SecureStringToCoTaskMemUnicode(other);
      try
      {
        //parse characters one by one - doesn't change the fact that
        //we have them in memory however...
        byte byteA = 1;
        byte byteB = 1;

        int index = 0;
        while (((char)byteA) != '' && ((char)byteB) != '')
        {
          byteA = Marshal.ReadByte(ptrA, index);
          byteB = Marshal.ReadByte(ptrB, index);
          if (byteA != byteB) return false;
          index += 2;
        }

        return true;
      }
      finally
      {
        Marshal.ZeroFreeCoTaskMemUnicode(ptrA);
        Marshal.ZeroFreeCoTaskMemUnicode(ptrB);
      }
    }
  }
}


Author: Categories: C#, Security Tags: ,