Twitter Debut
May 5th, 2009
 I’ve been somewhat hesitant, but being able to quickly exchange thoughts with the community just sounds too good – I have to try this out.
Follow me @ http://twitter.com/phsumi
I’ve been somewhat hesitant, but being able to quickly exchange thoughts with the community just sounds too good – I have to try this out.
Follow me @ http://twitter.com/phsumi
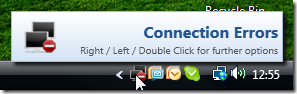
I’m happy to announce the public release of my WPF NotifyIcon control 🙂
This is an implementation of a NotifyIcon (aka system tray icon or taskbar icon) for the WPF platform. It does not just rely on the existing Windows Forms component, but is a purely independent control which leverages several features of the WPF framework in order to display rich ToolTips, Popups, context menus, and balloon messages.
I’m planning on doing an introductory article on CodeProject (well, somewhere along the way…) but you’ll probably get along just fine – the control comes with a sample application that shows off most of the control’s features.
Further information and download on the project page:
http://www.hardcodet.net/projects/wpf-notifyicon
And yet another markup extension that hopefully makes things a little easier for you. Basically, it’s the same pattern that the good doctor described here for value converters, but with custom commands in mind.
Basically, this extension makes your commands immediately available without having to declare them. One "traditional" way to declare a command is directly in XAML:
<Window.Resources>

  <cmd:HelloWorldCommand x:Key="SayHello" />

</Window.Resources>
…and then apply it like this:
<Button Command="{StaticResource SayHello}" />
The declaration part above can become somewhat tedious, especially if you have quite a few commands (e.g. because you are using a ribbon with lots of buttons on it). Thanks to using a markup extension, you can skip the declaration part altogether and just declare your command.
<Button Command="{cmd:HelloWorldCommand}" />
/// <summary>
/// Basic implementation of the <see cref="ICommand"/>
/// interface, which is also accessible as a markup
/// extension.
/// </summary>
public abstract class CommandExtension<T> : MarkupExtension, ICommand
    where T:class, ICommand, new()
{
  /// <summary>
  /// A singleton instance.
  /// </summary>
  private static T command;


  /// <summary>
  /// Gets a shared command instance.
  /// </summary>
  public override object ProvideValue(IServiceProvider serviceProvider)
  {
    if (command == null) command = new T();
    return command;
  }


  /// <summary>
  /// Fires when changes occur that affect whether
  /// or not the command should execute.
  /// </summary>
  public event EventHandler CanExecuteChanged
  {
    add { CommandManager.RequerySuggested += value; }
    remove { CommandManager.RequerySuggested -= value; }
  }


  /// <summary>
  /// Defines the method to be called when the command is invoked.
  /// </summary>
  /// <param name="parameter">Data used by the command.
  /// If the command does not require data to be passed,
  /// this object can be set to null.
  /// </param>
  public abstract void Execute(object parameter);


  /// <summary>
  /// Defines the method that determines whether the command
  /// can execute in its current state.
  /// </summary>
  /// <returns>
  /// This default implementation always returns true.
  /// </returns>
  /// <param name="parameter">Data used by the command.
  /// If the command does not require data to be passed,
  /// this object can be set to null.
  /// </param>
  public virtual bool CanExecute(object parameter)
  {
    return true;
  }
}
…and here’s a sample implementation:
public class HelloWorldCommand : CommandExtension<HelloWorldCommand>
{
  public override void Execute(object parameter)
  {
    MessageBox.Show("Hello world.");
  }
}
Of course, nothing prevents you from pimping the base class a little to your needs 🙂
Logging is an important aspect, but I don’t like to have dependencies on a specific logging framework all over the place. This is where a logging façade comes in handy. Basically, a façade just provides you with a common interface that decouples the used logging framework from your code:
//ILogger is the facade. Behind the scenes,
//a framework of your choice is used
ILogger logger = LoggerService.Logger;
logger.Log("hello world");
The idea of a logging façade isn’t exactly new, but I thought I’d share this one with you for a few reasons:
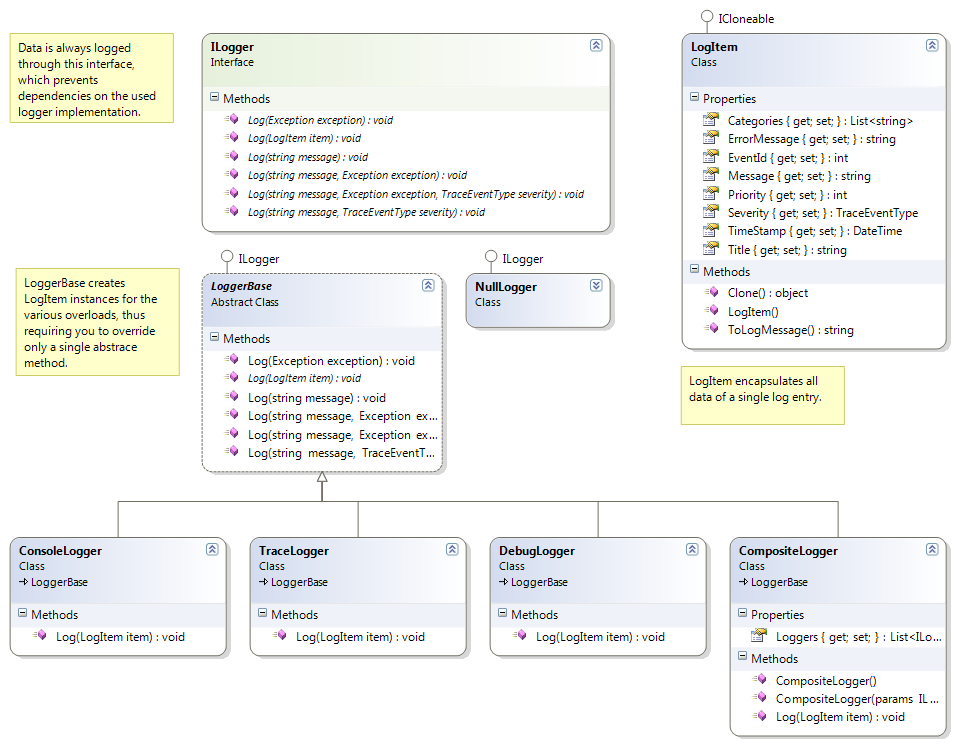
(click on image to enlarge)
Here’s one way to create a file-based logger (using the BitFactory façade) and make it globally accessible. This only takes you a few lines of code:
//create a new logger instance
string file = @"C:logfile.txt";
ILogger logger = BitFactoryLogger.CreateSingleFileLogger(file);

//use the global LoggerService to store the logger
LoggerService.SetLogger(logger);


...


//this will store the info in the log file
LoggerService.Logger.Log("This is an information");
The whole purpose of this project is to shield your libraries from the actually chosen logging framework. Accordingly, you are always logging through the ILogger instance. ILogger provides quite a few overloads of the Log method, here are a few of them:
public void LogData(ILogger logger)
{
  logger.Log("An information");
  logger.Log("Something Happened", TraceEventType.Warning);

  //LogItem is the most verbose version
  LogItem item = new LogItem();
  item.Message = "My Message";
  item.EventId = 999;
  item.Categories.Add("Foo");
  item.Priority = 10;
  logger.Log(item);

  try
  {
    DivideByZero();
  }
  catch(Exception e)
  {
    logger.Log(e);
    logger.Log("Additional message.", e);
    logger.Log("Additional message.", e, TraceEventType.Critical);
  }
}
During the initialization of your application, you will have to specify the the logger implementation that is supposed to be used. This might happen declaratively or directly in code. Here’s the initialization code from NetDrives, which makes a logger available through the AutoFac IOC container.
Note that I’m registering a ConsoleLogger for debug builds, while release builds write into a log file. These are completely different classes, but it doesn’t matter – they both implement the ILogger interface:
//init IOC container builder
var builder = new ContainerBuilder();

//register single logger instance
ILogger logger;

#if (DEBUG)
  logger = new ConsoleLogger();
#else
  logger = BitFactoryLogger.CreateSingleFileLogger(AppUtil.LogFile);
#endif

//register logger
builder.Register(logger).As<ILogger>();
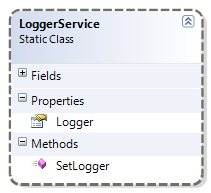
I prefer to initialize and access my logger through an IOC container, but you can do it however you like. If you’re lacking a place to make your ILogger globally accessible, you can use the static LoggerService class:
public void InitApp()
{
  //create a file logger (use BitFactory facade)
  string logFile = @"C:MyLogFile.txt";
  ILogger logger = BitFactoryLogger.CreateSingleFileLogger(logFile);

  //register as globally used logger
  LoggerService.SetLogger(logger);
}


private void Foo()
{
  try
  {
    DoSomethingWrong();
  }
  catch(Exception e)
  {
    //get registered logger and log exception
    ILogger logger = LoggerService.Logger;
    logger.Log(e);
  }
}
A nice thing about LoggerService: It guarantees you always a valid ILogger instance. If no logger is set, it just falls back to a NullLogger implementation that does not create any output at all. Here’s the implementation:
namespace Hardcodet.Util.Logging
{
  /// <summary>
  /// Provides a global repository for a given <see cref="ILogger"/>
  /// instance. This class ensures that the <see cref="Logger"/>
  /// property is never nullo - in case no logger is defined, it
  /// automatically installs a <see cref="NullLogger"/>
  /// instance.
  /// </summary>
  public static class LoggerService
  {
    private static ILogger logger = new NullLogger();


    /// <summary>
    /// Gets the installed <see cref="ILogger"/> implementation.
    /// </summary>
    /// <remarks>This property always returns a valid
    /// logger.</remarks>
    public static ILogger Logger
    {
      get { return logger; }
    }


    /// <summary>
    /// Installs a given logger or resets the <see cref="Logger"/>
    /// to a <see cref="NullLogger"/> instance if the
    /// <paramref name="loggerImplementation"/> is a null
    /// reference.
    /// </summary>
    /// <param name="loggerImplementation">The logger to be
    /// used globally, or a null reference in order to reset
    /// the service.</param>
    public static void SetLogger(ILogger loggerImplementation)
    {
      logger = loggerImplementation ?? new NullLogger();
    }
  }
}
In case you want to use another logging framework (e.g. NLog or Log4Net), creating a new façade is very easy. Basically, you create a new project, set a reference to the base library and write a class that either
Feel like sharing your own façade? Just contact me and I’ll happily include your implementation 🙂
As a sample, here’s the code of the ConsoleLogger (part of the core library) and the Enterprise Library façade:
using System;

namespace Hardcodet.Util.Logging
{
  /// <summary>
  /// A very simple implementation of <see cref="ILogger"/>
  /// that outputs all messages to the system console.
  /// </summary>
  public class ConsoleLogger : LoggerBase
  {
    /// <summary>
    /// Logs a given item to the console.
    /// </summary>
    /// <param name="item">The item to be logged.</param>
    /// <exception cref="ArgumentNullException">If <paramref name="item"/>
    /// is a null reference.</exception>
    public override void Log(LogItem item)
    {
      if (item == null) throw new ArgumentNullException("item");
      Console.Out.WriteLine(item.ToLogMessage());
    }

  }
}
using Microsoft.Practices.EnterpriseLibrary.Logging;


namespace Hardcodet.Util.Logging.EntLibFacade
{
  /// <summary>
  /// An implementation of the <see cref="ILogger"/>
  /// interface which outputs logged data using
  /// the <see cref="Logger"/> of the MS Enterprise
  /// Library.
  /// </summary>
  public class EnterpriseLibraryLogger : LoggerBase
  {

    /// <summary>
    /// Writes a log entry to the Enterprise Library's
    /// logging block. Output depends on the logging
    /// block's configuration.
    /// </summary>
    /// <param name="item">An log item which encapsulates
    /// information to be logged.</param>
    public override void Log(LogItem item)
    {
      LogEntry entry = ConvertLogItem(item);
      Logger.Write(entry);
    }


    /// <summary>
    /// Creates a <c>LogEntry</c> instance which can be processed
    /// by the Enterprise Library based on a given log item.
    /// </summary>
    /// <param name="item">An log item which encapsulates information
    /// to be logged.</param>
    /// <returns>An Enterprise Library item which corresponds
    /// to the submitted <c>LogItem</c>.</returns>
    private static LogEntry ConvertLogItem(LogItem item)
    {
      //assign properties
      LogEntry entry = new LogEntry();
      entry.Message = item.Message;
      entry.Title = item.Title;
      entry.AddErrorMessage(item.ErrorMessage);
      entry.EventId = item.EventId;
      entry.Priority = item.Priority;
      entry.Severity = item.Severity;
      entry.TimeStamp = item.TimeStamp;

      foreach (string category in item.Categories)
      {
        item.Categories.Add(category);
      }

      return entry;
    }

  }
}
The download contains the core library, two external façades (BitFactory, Enterprise Library), and a sample project. Hope you’ll like it 🙂
Note: There’s a follow-up posting to that one that relies on Blend Behaviors.
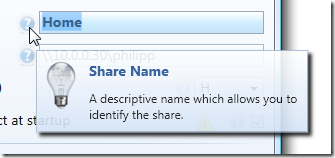
NetDrives does not rely on styles when it comes to displaying ToolTips, but uses a simple markup extension, that provides the following functionality:
Here’s what the XAML looks like:
<Image
  Source="..SharedImagesHelpSmall.png"
  ToolTip="{ext:Info Title=ShareNameTitleToolTip, Body=ShareNameInfoToolTip}"
  />
…and this is the output:
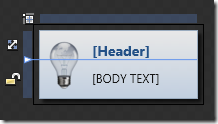
The first step is to create a simple control that contains the ToolTip. Basically, this is a simple UserControl with the following features:
Here’s what the control looks like in Blend:
Of course, you can easily use this user control through styles and/or directly declared in XAML whenever you need:
<Image Source="..SharedImagesHelpSmall.png">
  <Image.ToolTip>
    <MyToolTipControl Header="My Title" Body="This is a ToolTip" />
  </Image.ToolTip>
</Image>
However, this would still take a style to hide the tooltip border and you are lacking resource file lookups. The markup extension makes this way easier…
MarkupExtension is one of the lesser known stars in WPF – it requires a little coding, but once in place, it greatly simplify things for you. A simple yet brilliant example is Dr. WPF’s ValueConverter extension, and I already blogged a few times about other applications.
This Info markup extension basically provides the following:
/// <summary>
/// A markup extension that returns a
/// <see cref="InfoPopup"/> control preconfigured
/// with header and text information according to the
/// <see cref="Title"/> and <see cref="Body"/>
/// properties.
/// </summary>
public class Info : MarkupExtension
{
  /// <summary>
  /// Either a title text or a resource key that can be used
  /// to look up the title.
  /// </summary>
  public string Title { get; set; }

  /// <summary>
  /// Either a tooltips' main text or a resource key that can be used
  /// to look up the text.
  /// </summary>
  public string Body { get; set; }

  /// <summary>
  /// Empty default constructor.
  /// </summary>
  public Info()
  {
  }

  /// <summary>
  /// Inits the <see cref="Info"/> markup extension
  /// with the title and body.
  /// </summary>
  public Info(string title, string body)
  {
    Title = title;
    Body = body;
  }

  /// <summary>
  /// Performs a lookup for the defined <see cref="Title"/> and
  /// <see cref="Info"/> and creates the tooltip control.
  /// </summary>
  /// <returns>
  /// A tooltip control.
  /// </returns>
  public override object ProvideValue(IServiceProvider serviceProvider)
  {
    //create the user control that
    InfoPopup popup = new InfoPopup();

    if (!String.IsNullOrEmpty(Title))
    {
      //look up title - if the string is not a
      //resource key, use it directly
      var result = Resources.ResourceManager.GetObject(Title) ?? Title;
      popup.HeaderText = (string)result;
    }

    if (!String.IsNullOrEmpty(Body))
    {
      //look up body text - if the string is not a
      //resource key, use it directly
      var result = Resources.ResourceManager.GetObject(Body) ?? Body;
      popup.BodyText = (string)result;
    }

    //create tooltip and make sure only the content is visible
    ToolTip tt = new ToolTip();
    tt.HasDropShadow = false;
    tt.BorderThickness = new Thickness(0);
    tt.Background = Brushes.Transparent;
    tt.Content = popup;

    return tt;
  }
}
This is only one of several ways to tackle the problem, but I really like that it only takes a single line to have a rich ToolTip in place. The implementation provided here may not completely suit your requirements, but it can easily be tailored to your needs.
The link below points to a sample project that contains both the markup extension and ToolTip control. Enjoy 🙂
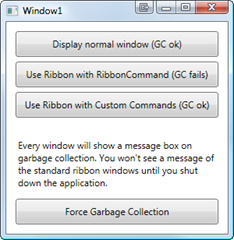
I stumbled over an issue when dealing with Microsoft’s WPF ribbon today. Apparently, the control that heavily relies on RibbonCommands rather than arbitrary ICommand instances may cause severe memory leaks. Have a look at this simple Window:
<Window ...>
  <Grid>
    <Grid.Resources>
      <r:RibbonCommand
        x:Key="MyCommand"
        Executed="OnRibbonClicked"
        LabelTitle="Click Me" />
    </Grid.Resources>

    <!-- a ribbon that only displays a command in the quick access toolbar -->
    <r:Ribbon>
      <r:Ribbon.QuickAccessToolBar>
        <r:RibbonQuickAccessToolBar>
          <r:RibbonButton
            Command="{StaticResource MyCommand}"
            r:RibbonQuickAccessToolBar.Placement="InToolBar" />
        </r:RibbonQuickAccessToolBar>
      </r:Ribbon.QuickAccessToolBar>
    </r:Ribbon>
  </Grid>
</Window>
…and here’s the event listener that was declared for the RibbonCommand:
private void OnRibbonClicked(object sender, ExecutedRoutedEventArgs e)
{
  MessageBox.Show("Ribbon command executing.");
}
Once opened and closed, this window will not be garbage collected until the application shuts down. The reason is the OnRibbonClicked event handler that doesn’t get deregistered.
There are signs that Microsoft will dump RibbonCommand completely once the ribbon goes live. However: This probably won’t happen too fast, so you will have to solve the issue on your own. On the bright side: It forces a cleaner design on you.
I prefer custom commands anyway, so the natural way to go was to simply implement my own class that derives from RibbonCommand:
///<summary>
/// Base class for custom <see cref="RibbonCommand"/>
/// implementations.
///</summary>
public abstract class RibbonCommandBase : RibbonCommand
{
  /// <summary>
  /// Creates the command and registers weak event listeners.
  /// </summary>
  protected RibbonCommandBase()
  {
    Executed += OnExecute;
    CanExecute += OnCanExecute;
  }


  /// <summary>
  /// Determines whether the command can be executed or not.
  /// The default implementation always allows that.
  /// </summary>
  protected virtual void OnCanExecute(object sender, CanExecuteRoutedEventArgs e)
  {
    e.CanExecute = true;
  }


  /// <summary>
  /// Command implementation - executes command logic.
  /// </summary>
  protected abstract void OnExecute(object sender, ExecutedRoutedEventArgs e);
}
The noteworthy thing here is that this abstract base class registers event listeners for its own events – one virtual, one abstract. Accordingly, a deriving command implementation only has to provide its own OnExecute and OnCanExecute (optional) methods to get going:
public class MessageCommand : RibbonCommandBase
{
  protected override void OnExecute(object sender, ExecutedRoutedEventArgs e)
  {
    MessageBox.Show("Ribbon command executing.");
  }
}
The last thing to correct is the command declaration in XAML – rather than declaring a RibbonCommand with a code-behind event listener, you declare your custom command (MessageCommand in the sample below). As you can see, there is no longer a listener for the Executed event – the command takes care of this on its own. Accordingly, this command can be declared in a resource dictionary without a code-behind file.
<!-- Custom command - can be declared in a resource dictionary -->
<cmd:MessageCommand x:Key="MyCommand"
                    LabelTitle="Click Me"
                    SmallImageSource="About.png"
/>
The attached sample project shows the two variants and the missing garbage collection of the standard ribbon commands.
I wasn’t sure about licensing restrictions, therefore I did not include the WPF ribbon assembly in the downloadable sample – you’ll have to add the reference yourself before compiling. Sorry for the inconvenience :/
Download: ribbon-commands.zip