Archive

Archive for 2010

Input Focus from the View Model – Configured via Blend Behaviors

March 17th, 2010

Background / Focus of this Article

WPF wizard and fellow WPF Disciple Josh Smith published an article yesterday that showed how to control input focus from View Model objects using attached properties and a custom binding extension. Prior to the article, there was a discussion in the Disciples group, during which I looked into using Blend behaviors as an alternative configuration approach to Josh’s markup extension – this article here discusses this approach.

Accordingly, this posting is not about controlling input focus. Josh did all the legwork there, and you should check out the article on his blog. Everything that goes beyond the Behavior classes is Josh’s work, not mine  – I merely discuss a different approach regarding the declaration of focus control on the UI using Blend Behaviors.


Download Source Code and Sample Application


Differences

Let’s start by looking at the difference from a developer’s point of view. Assume you have a simple TextBox control that is bound to a FirstName property on the View Model:

<!-- simple textbox -->
<TextBox Text="{Binding FirstName}" />


Markup Extensions – One for the XAML Guys / Gals

Josh’s approach using a markup extension is a very lean way to wire up your control with the focus controller. If you’re used to coding in XAML, this is pretty much the quickest way to get things running. Note that only the Binding keyword was replaced by a the custom FocusBinding markup extension:

<!-- simple textbox -->
<TextBox Text="{jas:FocusBinding FirstName}" />


If you’re working in Visual Studio, this is the way to go (even more so if you have ReSharper to take care of the namespace declarations for you). It might become tedious, however, if’ you’re working in a Blend environment: For one thing, there’s the namespace declarations. And then, you can no longer wire up your bindings directly in Blend on the designer surface.


Blend Behaviors – Designer’s Flavor

The Blend Behaviors don’t require you to write any XAML at all. The data binding itself remains unchanged, and the TextBoxFocusBehavior was just dragged/dropped on the TextBox in Blend. Accordingly, you can set up both binding and input focus control with a few mouse clicks without having to leave the designer surface:

image


If you look at XAML source, you’ll notice that the Behavior above actually produces substantially more markup – this isn’t something you’d want to type in manually:

<TextBox Text="{Binding FirstName}" >
    <i:Interaction.Behaviors>
        <FocusVMLib_Behaviors:TextBoxFocusBehavior/>
    </i:Interaction.Behaviors>
</TextBox>


In order to compare the two approaches, just download the attached sample and have a look at the two Window classes. Window1 is the original implementation (using the markup extension), Window2 uses the Blend behaviors. The end result is the same – the only difference is the different declaration approaches.


The Behavior Classes

The rest of this blog post discusses the implementation of the behavior classes, and suggests an approach to support different control types.

Read more…

Author: Categories: WPF Tags: ,

Remote File Access in VFS using OpenRasta – Part 1 (Introduction)

February 14th, 2010

This lose series of articles will cover the implementation of a file system façade that allows transparent remote file system access in VFS.

The series will cover the following topics:

  • Introduction and basic concept (this article)
  • Implementing a RESTful file system proxy service with OpenRasta (coming soon)
  • Unit testing the OpenRasta proxy service (not yet published)
  • General tutorial: Streaming binary data in Silverlight
  • Implementing VFS client libraries for both .NET and Silverlight (not yet published)

VFS File System Providers

VFS abstracts access to arbitrary file systems through so-called “File System Providers”, which expose a common interface (IFileSystemProvider) that allows you to browse and modify the file system. The interface is not exactly lean, but easy to understand:

image

Now, common file system providers directly operate on some kind of hierarchical data. Here’s a few examples:

  • The “Local File System Provider” allows you to access your local machine, or the contents of a dedicated directory.
  • The “ZIP File System Provider” works upon a single ZIP file, and allows you to transparently access and modify its contents.
  • An “FTP File System Provider” connects to a given FTP server and gives you access to the server’s files through the VFS API.

So basically, an application uses a VFS provider, which in turn directly accesses the exposed file system:

image


Tunneling Façades

There is, however, a special family of file system providers that do not access any files. Instead, they forward file system requests to another file system provider, thus creating a tunnel to another file system. Basically, these file system providers are façades to another, arbitrary file system provider.

image


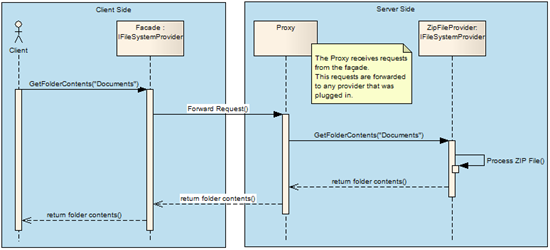
Here’s an exemplary scenario that uses a façade in order to access a ZIP file that is exposed through a ZIP file provider (click on the UML diagram in order to see it in full size).

 Tunnelling


The interesting point here: From the client’s perspective, there is no difference in accessing the file system. The façade itself implements the IFileSystemProvider interface – it provides exactly the same API as any other provider.

As you can see from the diagram above, a façade is usually complemented by some kind of proxy that receives the forwarded requests, so in order to implement the pattern, there’s two components to be written:

  1. The façade, which implements IFileSystemProvider.
  2. The proxy that takes the forwarded requests, forwards them its own file system provider, and eventually returns the requested data. This proxy is not a VFS component, and you don’t have to implement any VFS interfaces.

As you can guess, tunnels come in handy in order to access remote data. Here’s a few scenarios:

  • Run a local file system provider on a server that provides a download service. Clients don’t have direct access to the files, but use a tunnel to access the files that are exposed through the provider that runs on the server.
  • Allow a Silverlight client to browse the contents of a ZIP file on the server, without having to download the whole ZIP file first (sample coming).
  • Host a cloud file system provider within a WCF service, and expose parts of the cloud’s data to clients. Like this, clients don’t have direct access to the cloud data.

A RESTful Façade Implementation

Every façade itself is an independent file system provider – so tunneling is rather a pattern than an API, and you can write your own façade should you wish to (actually, contributions will be most welcome!).

However, VFS 1.0 will ship with a single façade implementation that uses HTTP/REST to create a tunnel to a remote file system. It is built upon the following libraries:

  • On the server side, OpenRasta was used to expose file system access as RESTful services. OpenRasta is a lightweight, but powerful framework that comes with a API.
  • On the client side, the WCF REST Starter Kit was used for both .NET and Silverlight clients (the Silverlight library hacked together by myself). The starter kit’s client libraries allow for simple access to RESTful resources, even if there is no WCF involved.


The upcoming articles will walk you through the implementation of the both the client and service libraries, and will also be complemented by a preview release of VFS. Stay tuned 🙂

Author: Categories: REST, VFS Tags:

REST Client Library for Silverlight

February 8th, 2010

I’ve been doing some hackery and ported the client libraries of the WCF REST Starter Kit to Silverlight. The library greatly simplifies things when it comes to accessing and consuming RESTful services and resources in your Silverlight application.

Here’s a sample for a simple GET using the HttpClient class:

public User GetUser(string userId)
{
  //init client with base URI
  HttpClient client = new HttpClient(http://localhost:56789/users/);

  //send a HTTP GET request for a given resource
  HttpResponseMessage response = client.Get(userId);

  //parse the received data on the fly
  return response.Content.ReadAsDataContract<User>();
}


Or, in order to send a DTO via HTTP POST:

public void PostUser(User user)
{
  //init client with base URI
  HttpClient client = new HttpClient("http://localhost:56789/");

  //serialize user object
  HttpContent content = HttpContentExtensions.CreateDataContract(user);

  //post to user service
  HttpResponseMessage response = client.Post("/user", content);
}


I have removed a few bits, but most of the functionality should be there, and I added “NOTE” comments to all the sections that I had to modify. I haven’t used this port in-depth but managed to access my RESTful resources as expected so far, and I hope it will work just fine as in most scenarios that are covered in the original Starter Kit. Of course, given the Starter Kit itself is prerelease software, this applies to this release even more.


Blocking vs. Async Operations

If you try to initiate a blocking request to your REST service on the UI thread, an InvalidOperationException is thrown due to synchronization issues. Accordingly, a snippet as the one above should always be invoked on a worker thread (which is a best practice anyway).

However, in order to simplify things, I’ve added a bunch of XXXAsync extension methods for the HttpClient class that allow you to invoke HTTP operations such as GET, POST, PUT etc. directly on the UI thread, and have the result delivered back to you through a simple callback action. Here’s the same snippet as above, this time using the GetAsync method of the HttpClient class:

public void GetFolder()
{
  HttpClient client = new HttpClient("http://localhost:56789/root");

  //you can invoke the GetAsync method on a worker thread
  client.GetAsync(response =>
    {
      VirtualFolder folder = response.Content.ReadAsDataContract<VirtualFolder>();
    });
}


Note that the callback action will be invoked on a worker thread, so you might have to switch back to the UI thread if you want to modify your UI.


Oh yes: Use at your own risk 😉


Download REST Starter Kit for Silverlight

Current Version: 1.0.3, 2010.02.14

Author: Categories: REST, Silverlight Tags: ,

A GetResponse Extension for Synchronized Web Requests in Silverlight

February 8th, 2010

Unlike its CLR counter part, Silverlight’s HttpWebRequest does not provide a synchronous GetResponse method that allows to receive an HTTP response in a blocking operation. As a result, you are forced to use the asynchronous BeginGetResponse method, and handle the results on a callback method.

This makes sense if the response is requested on the UI thread (otherwise, it would freeze the UI), but it might be a problem in certain scenarios (e.g. if you want to submit multiple requests in an orderly fashion).

However, you can get around the issue by using wait handles, which allow you to easily block a running operation. I encapsulated the required functionality in a simple extension method that brings GetResponse method back into Silverlight.

The usage is simple – you just invoke the GetResponse() extension method with an optional timeout. Here’s a sample that submits five synchronous HTTP requests:

private void RunRequests()
{
  for (int i = 0; i < 5; i++)
  {
    Uri uri = new Uri("http://localhost/users?user=" + i);
    HttpWebRequest request = 
      (HttpWebRequest)WebRequestCreator.ClientHttp.Create(uri);

    //get response as blocking operation which times out after 10 secs
    HttpWebResponse response = request.GetResponse(10000);
  }
}


You will run into timeout issues if you run execute this method on the UI thread because internally, the requested response accesses the UI thread (for whatever reasons). Only invoke this extension method on background threads!


Here’s the implementation:

public static class RequestHelper
{
  /// <summary>
  /// A blocking operation that does not continue until a response has been
  /// received for a given <see cref="HttpWebRequest"/>, or the request
  /// timed out.
  /// </summary>
  /// <param name="request">The request to be sent.</param>
  /// <param name="timeout">An optional timeout.</param>
  /// <returns>The response that was received for the request.</returns>
  /// <exception cref="TimeoutException">If the <paramref name="timeout"/>
  /// parameter was set, and no response was received within the specified
  /// time.</exception>
  public static HttpWebResponse GetResponse(this HttpWebRequest request,
                                            int? timeout)
  {
    if (request == null) throw new ArgumentNullException("request");

    if (System.Windows.Deployment.Current.Dispatcher.CheckAccess())
    {
      const string msg = "Invoking this method on the UI thread is forbidden.";
      throw new InvalidOperationException(msg);
    }

    AutoResetEvent waitHandle = new AutoResetEvent(false);
    HttpWebResponse response = null;
    Exception exception = null;

    AsyncCallback callback = ar =>
       {
         try
         {
           //get the response
           response = (HttpWebResponse)request.EndGetResponse(ar);
         }
         catch(Exception e)
         {
           exception = e;
         }
         finally
         {
           //setting the handle unblocks the loop below
           waitHandle.Set(); 
         }
       };


    //request response async
    var asyncResult = request.BeginGetResponse(callback, null);
    if (asyncResult.CompletedSynchronously) return response;

    bool hasSignal = waitHandle.WaitOne(timeout ?? Timeout.Infinite);
    if (!hasSignal)
    {
      throw new TimeoutException("No response received in time.");
    }

    //bubble exception that occurred on worker thread
    if (exception != null) throw exception;

    return response;
  }
}
Author: Categories: Silverlight Tags:

A Simplistic Random String Generation Snippet

January 25th, 2010

This is just a little snippet that generates a random string, containing both upper and lower case characters and special chars, so there’s a range of 93 possible characters, taken from the UTF-8 character table. I thought I’d post it as the snippets I’ve seen after a quick search usually just generate strings with characters ranging from ‘A’ to ‘Z’, or do not work with properly initialized seeds.

Note that this method uses a static int field (seedCounter) when in comes to creating a random seed. This counter is incremented in a thread safe manner every time the method is being invoked. This simple trick is a simple workaround to the notoriously unreliable Random class, and effectively prevents double seeds (and thus: duplicate “random strings”) if the GetRandomString method is being invoked several times immediately. As an alternative, you could also use a static Random field, which would only have to be initialized once. My implementation has the smaller footprint (and integer variable), while a Random field would perform much better (currently, every invocation calculates a seed and creates a new Random instance). The better choice depends on the context I guess:


/// <summary>
/// A counter that is being incremented with every invocation of
/// <see cref="GetRandomString"/>.
/// </summary>
private static int seedCounter = (int)DateTime.Now.Ticks;


/// <summary>
/// Generates a random string of a given length, which consists
/// of characters taken from the UTF-8 table (0x21 - 0x7e).
/// </summary>
/// <param name="length">The length of the random string.</param>
/// <returns>Random characters.</returns>
public static string GetRandomString(int length)
{
  const int lower = 0x21;
  const int upper = 0x7e;

  StringBuilder builder = new StringBuilder();

  //increment thread-safe
  seedCounter = Interlocked.Increment(ref seedCounter);

  //create random with the seed (make sure it's not int.MinValue)
  Random rnd = new Random(seedCounter %int.MinValue);

  for (int i = 0; i < length; i++)
  {
    builder.Append((char) rnd.Next(lower, upper));
  }

  return builder.ToString();
}


Accordingly, invoking the method like this:

string random = GetRandomString(10);


…generates you a string comparable to this one: 2#,R`6>Cz{

Author: Categories: C# Tags:

Lightweight Task Scheduling Library for .NET / Silverlight

January 9th, 2010

I’m currently working on VFS, a virtual file system. For running transfers, VFS internally maintains locks that do have expiration time. Accordingly, I found myself in need for a job scheduling mechanism in order to properly release expired locks. I looked around for a few alternatives, but eventually ended up writing my own lightweight version.

Features:

  • Simple scheduling and callback mechanisms
  • Silverlight compatible
  • Lightweight
  • Fluent API
  • Detection of system time changes with optional rescheduling
  • Optional forwarding of exceptions during job execution
  • Open Source (Ms-PL)


Download library and sample

Current Version: 1.0.2, 2010.01.12


What Does it Do?

Basically, the library allows you to create a job, and submit that job to a scheduler, along with a callback action. This callback action is invoked as soon (or every time) the job is due.

Before going into the details, here’s a first code snippet that creates a simple Job that is supposed to run repeatedly (every 1.5 seconds) for a minute. Once the job is created, it is submitted to a Scheduler instance which processes the job and makes sure the submitted callback action is being invoked every time the job is due:

private Scheduler scheduler = new Scheduler();

public void RunOnce()
{
  //define a start / end time
  DateTime startTime = DateTime.Now.AddSeconds(5);
  DateTime endTime   = startTime.AddSeconds(60);

  //configure the job
  Job consoleJob = new Job();
  consoleJob.Run.From(startTime)
                .Every.Seconds(1.5)
                .Until(endTime);

  //submit the job with the callback to be invoked
  scheduler.SubmitJob(consoleJob, j => Console.Out.WriteLine("hello world"));
}


Silverlight

The project provides class libraries for .NET 3.5 and Silverlight 3, along with a Silverlight sample application that shows how to add scheduling functionality to your SL application with just a few lines of code.

While long-term scheduling isn’t probably something you need to do in a Silverlight application, the scheduler simplifies the management of periodic jobs, such as polling a server for updates. Below is a snippet from the Silverlight sample application. This job starts immediately, and runs indefinitely with an interval of 2 seconds:

private void CreateJob2()
{
  //create job
  Job<int> job = new Job<int>("Job 2");
  job.Data = 0;
  job.Run.Every.Seconds(2);

  //submit to scheduler
  scheduler.SubmitJob(job, LogJobExecution);
}


private void LogJobExecution(Job<int> job, int data)
{
  //updates user interface
}


image


Jobs


A job is a simple configuration item for the scheduler. There’s two built-in job types: Job and Job<T>. The only difference between the two is that the latter provides a Data property which allows you to attach state information directly to the job and have it delivered back to you when the job runs.

Read more…