Archive

Archive for 2008

Organizing Heterogeneous Data on a WPF TreeView

December 11th, 2008

Most WPF TreeView samples you see on the web are somewhat simplistic: While they may provide heterogeneous data, usually all childs of a given node are of the same type:
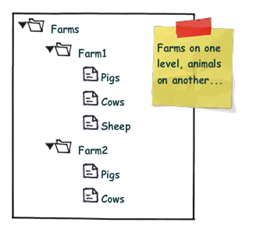
simpletree

However, more often than not, you’re running into more complex scenarios where additional structuring is necessary. Image your Farm class looks like this:

image

Accordingly, you might want to display that information according to the sketch below:
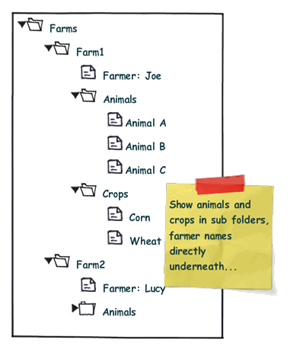
complextree

Note the difference: We want to organize the Animals and Crops collections within individual sub folders, while the "Farmer" node is a direct child of the "Farm" root node. From the control’s point of view, this means that the "Folder" nodes and the "Farmer" node are siblings.

Now, one solution to that very problem are ViewModel wrapper classes that optimize the business logic for your specific UI logic. This route does work very well for quite a few scenarios. However, sometimes, you just want to have a quick solution. I’ll try to provide one here…

My solution to that very problem requires the following ingredients:

  • A MultiBinding that allows you to combine different bindings.
  • A converter that helps us organizing the different bound collections into sub folders, where necessary.
  • And of course: Data templates that provide a visual representation of your bound data.


Let’s start with the bindings, which are declared within a HiearchicalDataTemplate. You can use a MultiBinding to retrieve all necessary data of a given Farm instance:


<HierarchicalDataTemplate DataType="{x:Type local:Farm}">

  <!-- bind the different data sources -->
  <HierarchicalDataTemplate.ItemsSource>
    <MultiBinding>
      <Binding Path="Farmer" />
      <Binding Path="Animals" />
      <Binding Path="Crops" />
    </MultiBinding>
  </HierarchicalDataTemplate.ItemsSource>

  <TextBlock Text="{Binding Path=FarmName}" />

</HierarchicalDataTemplate>


A MultiBinding always needs a converter of type IMultiValueConverter. Our converter has to provide the following functionality:

  • Allow binding of simple objects (Farmer), or collections (Animals, Crops).
  • Where necessary, put a bound child item or collection into a virtual container object that can serve as a "folder" when it comes to rendering.
  • Provide means to name (or even identify) a folder in order to simplify styling.
  • Render specific child items directly under the parent node (no subfolder). 
  • Return everything as a an object that can be bound to the TreeView.ItemsSource property.


I wrote a simple converter that performs these tasks. The initial declaration looks like this:

 
<MultiBinding Converter="{StaticResource folderConverter}">
  <Binding Path="Farmer" />
  <Binding Path="Animals" />
  <Binding Path="Crops" />
</MultiBinding>
 
…and it produces the following output:

image


Obviously, the data is being parsed parsed and assigned to the "Farm" nodes, but we’re still lacking the desired structure (sub folders for animals and plants). However, this can easily be done by setting the ConverterParameter property:


<MultiBinding Converter="{StaticResource folderConverter}"
              ConverterParameter=", Animals, Cultivated Plants">
  <Binding Path="Farmer" />
  <Binding Path="Animals" />
  <Binding Path="Crops" />
</MultiBinding>
 

The converter parameter allows you to define folders for any of the items that are bound within the MultiBinding, while an empty string inserts a bound item directly under the root item. The converter parameter above produces the following output:

 image


The tree now renders the farmers and four FolderItem instances. FolderItem is a very simple helper class that is used by the converter to store the bound Animals and Crops collections. It provides just two properties:

  • Name (the string that was defined through the converter parameter)
  • Items (the folder’s contents)

Currently, the tree does not know yet how to render a FolderItem class, which is why there’s just the name displayed. What’s missing here is an additional data template for FolderItem:


<!-- data template for FolderItem instances -->
<HierarchicalDataTemplate DataType="{x:Type vm:FolderItem}"
                          ItemsSource="{Binding Path=Items}">

  <TextBlock Text="{Binding Path=Name}" />

</HierarchicalDataTemplate>


This finally produces our desired output:

image


Simply delegating data organization to the SimpleFolderConverter allows us to individually structure heterogeneous data for our TreeView control with a very simplistic approach. Below is the complete XAML for the sample:


<Window
  x:Class="Hardcodet.Farms.Window1"
  xmlns="http://schemas.microsoft.com/winfx/2006/xaml/presentation"
  xmlns:x="http://schemas.microsoft.com/winfx/2006/xaml"
  xmlns:vm="clr-namespace:Hardcodet.Farms.ViewModel"
  xmlns:local="clr-namespace:Hardcodet.Farms.Model"
  Title="Window1"
  Height="300"
  Width="300">

  <Window.Resources>
    <vm:SimpleFolderConverter x:Key="folderConverter" />

    <!-- data template for Farm instances -->
    <HierarchicalDataTemplate DataType="{x:Type local:Farm}">

      <!-- bind the different data sources -->
      <HierarchicalDataTemplate.ItemsSource>
        <MultiBinding Converter="{StaticResource folderConverter}" 
                      ConverterParameter=", Animals, Cultivated Plants">
          <Binding Path="Farmer" />
          <Binding Path="Animals" />
          <Binding Path="Crops" />
        </MultiBinding>
      </HierarchicalDataTemplate.ItemsSource>

      <TextBlock Text="{Binding Path=FarmName}" />
    </HierarchicalDataTemplate>


    <!-- data template for FolderItem instances -->
    <HierarchicalDataTemplate DataType="{x:Type vm:FolderItem}"
                              ItemsSource="{Binding Path=Items}">
      <TextBlock Text="{Binding Path=Name}" />
    </HierarchicalDataTemplate>

  </Window.Resources>

  <!-- the treeview control -->
  <TreeView x:Name="farmsTree" />
  
</Window>


Of course, you can easily style any of the data templates to your liking. You find the complete sample under the link below. Enjoy 🙂

Download Sample Project (VS2008): farmtree.zip
Author: Categories: WPF, WPF TreeView Tags: ,

Putting the Fun back to Sketching: Balsamiq

December 8th, 2008

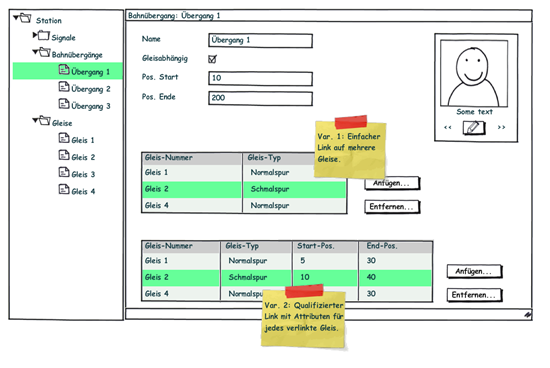
Ayende wrote about it and I felt I just have to spread the word: balsamiq is GREAT! I played around with the tool for about 10 minutes and then had to have it. Below is my first sketch with the tool – this is about 20 minutes work:

balsamiq

Love it 😀

Author: Categories: Tools, Uncategorized Tags:

A Covariant ObservableCollection for .NET 3.x

November 28th, 2008

When starting with generics, I was somewhat suprised that something like this didn’t work:


public interface IAnimal
{
}

public class Pig : IAnimal
{
}

public class AnimalFarm
{
  private ObservableCollection<Pig> pigs;

  public IEnumerable<IAnimal> Animals
  {
    get { return pigs; } //DOES NOT COMPILE
  }
}


The problem is that generics aren’t covariant, which is sometimes a bit of a problem when working with interfaces. However, while we’re waiting for C# 4.0, there is a poor man’s solution to covariance – the idea is to just expose the required IEnumerable<IAnimal> interface explicitly for the interface. And of course, there’s a generic solution to that problem:


/// <summary>
/// An implementation of <see cref="ObservableCollection{T}"/> that provides
/// an <see cref="IEnumerable{X}"/> interface for a super type of
/// <typeparamref name="T"/>.
/// </summary>
/// <typeparam name="T">The type of items to be stored in the collection.</typeparam>
/// <typeparam name="X">A super type of <typeparamref name="X"/>, for which this
/// collection provides an <see cref="IEnumerable{X}"/> interface, thus providing
/// covariance.</typeparam>
public class HybridObservableCollection<T, X> : ObservableCollection<T>,
                                                IEnumerable<X> where T : X
{

  /// <summary>
  /// Provides enumeration over type <see cref="X"/>.
  /// </summary>
  /// <returns>A <see cref="IEnumerator{X}"/>> that can be used to iterate
  /// through the collection.</returns>
  IEnumerator<X> IEnumerable<X>.GetEnumerator()
  {
    foreach (T t in this)
    {
      yield return t;
    }
  }

}


Note the type constraint: The second type parameter (X) must be convertible to the first one (T), which ensures that you can’t break the collection.

And as a result, we can return the collection as both IEnumerable<Pig> or IEnumerable<IAnimal>:

public class AnimalFarm
{
  //the collection provides both IEnumerable<Pig>, IEnumerable<IAnimal>
  private HybridObservableCollection<Pig, IAnimal> pigs;

  public IEnumerable<IAnimal> Animals
  {
    get { return pigs; } //WORKS
  }

  public IEnumerable<Pig> Pigs
  {
    get { return pigs; } //WORKS TOO
  }
}


Of course, rather than just IEnumerable<IAnimal>, you could easily expose IList<IAnimal> that way, but you would risk runtime exceptions if somebody tried to inject another IAnimal implementation into the base class that is not an instance of type Pig. However, in a safe environment, this might be well feasible if it lets you expose your collections as lists and still stick to interfaces.

Author: Categories: C#, Uncategorized, WPF Tags:

Generic Extension Methods to Test INotifyPropertyChanged

November 22nd, 2008

Just two extension methods I wrote in order to simplify testing of classes that implement INotifyPropertyChanged.

The first one just checks that the PropertyChanged event fires once and for the specified property:

 
/// <summary>
/// Checks whether a given action produces a change event for
/// a given property.
/// </summary>
/// <typeparam name="T">A class that implements <see cref="INotifyPropertyChanged"/>.
/// </typeparam>
/// <param name="host">The object that contains the changed property.</param>
/// <param name="changeAction">An action that triggers the
/// <see cref="INotifyPropertyChanged.PropertyChanged"/> event.</param>
/// <param name="propertyName">The name of the changed property, as advertised by the
/// <see cref="INotifyPropertyChanged.PropertyChanged"/> event.</param>
public static void AssertFiresPropertyChangedEvent<T> (this T host, string propertyName,
                                                       Action<T> changeAction)
                                                       where T : INotifyPropertyChanged
{
  bool fired = false;
  
  //register handler with assertion
  PropertyChangedEventHandler handler = (sender, e) =>
    {
      fired = true;
      Assert.AreEqual(propertyName, e.PropertyName);
    };

  //register listener, trigger action, then deregister
  host.PropertyChanged += handler;
  changeAction(host);
  host.PropertyChanged -= handler;

  Assert.IsTrue(fired);
}
 
Now in order to run my test, I can write something like this as long as I’m not having multiple threads that change my object under test:
 
 
//create new user
User user = new User("Tim");

//make sure changing the name raises event
user.AssertFiresPropertyChangedEvent("Name", u => u.Name = "Tom");


The second extension method makes sure the event is fired a given number of times for a specified property. Apart from the obvious one (looping a few times), this one has additional use cases:

  • I can test that the event doesn’t fire at all by setting the expected number of events to 0.
  • This method ignores events for other properties, whereas the snippet above fails.


/// <summary>
/// Checks whether a given action produces a specified number of property
/// change events for a given property.<br/>
/// This event listener just ignores event for properties other than
/// <paramref name="propertyName"/>.
/// </summary>
/// <typeparam name="T">A class that implements <see cref="INotifyPropertyChanged"/>.
/// </typeparam>
/// <param name="host">The object that contains the changed property.</param>
/// <param name="numberOfEvents">The expected number of change events for
/// the specified property</param>
/// <param name="changeAction">An action that triggers the
/// <see cref="INotifyPropertyChanged.PropertyChanged"/> event.</param>
/// <param name="propertyName">The name of the changed property, as advertised by the
/// <see cref="INotifyPropertyChanged.PropertyChanged"/> event.</param>
public static void AssertPropertyChangedEventCount<T>(this T host, string propertyName,
                                                      int numberOfEvents,
                                                      Action<T> changeAction)
                                                      where T : INotifyPropertyChanged
{
  int eventCount = 0;

  //register handler with assertion
  PropertyChangedEventHandler handler = (sender, e) =>
    {
      //increment if the event refers to the tested property
      if (e.PropertyName == propertyName) eventCount++;
    };

  //register handler, trigger action, then deregister
  host.PropertyChanged += handler;
  changeAction(host);
  host.PropertyChanged -= handler;

  //compare counted events with expected number
  Assert.AreEqual(numberOfEvents, eventCount);
}


Update:

If you want to test a full set of properties of a class at once, check out Josh Twist’s ClassTester: This handy little library simplifies things remarkably when it comes to testing complete classes or even assemblies.

Author: Categories: C#, Testing Tags:

A Debug Activity for Workflow Foundation

October 1st, 2008

After having worked mostly conceptually for a few months (a detour to enterprise messaging), I’m back to writing code and getting my hands dirty. And I finally managed to get the time to start playing with Windows Workflow 😀

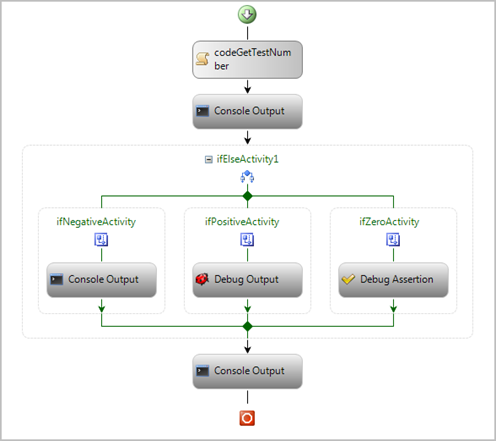
To me, learning is all about playing around with the technology, and here’s a first result that I think might be useful for you, too. This WF activity allows you to display an optionally parameterized message via console, debug window, or an assertion:

  • Console: The message is displayed via Console.WriteLine()
  • Debug: The message is displayed via Debug.WriteLine()
  • Assert: The message is displayed via Debug.Assert()


The activity supports binding points for up to 5 parameters and an optional Condition property to suppress output through either declarative or code conditions. The currently selected output mode  is nicely reflected by the designer.

 Debug Activities

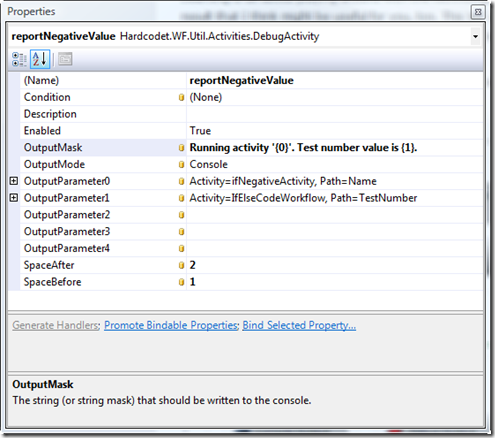
Basically, the activity enables you to quickly include debugging tasks into your workflow without leaving the designer. Below is a screenshot of the console output in the ifNegativeActivity branch:

Activity Properties

At runtime, this causes the following output on the console:

console


The library comes with the above sample, and pretty much demonstrates the different features. The only thing worth mentioning is the use of Conditions:

  • In case of Console or Debug output mode, a condition is not required. However, in case a condition was defined, the output message will only be displayed if the condition evaluates to true. Otherwise, the activity skips the output.
  • In case of Assert output mode, the Condition property is mandatory (validated by the designer). Furthermore, in compliance with Debug.Assert, the output message will only be displayed if the condition evaluates to false.


The activity itself is pretty simple, but it makes a nice addition to my toolbox, especially while I’m learning. Enjoy 🙂

Important: Once you opened the sample, you will have to restart VS2008 after the initial build, or the designer won’t work properly (apparently an issue with the IDE’s cache)!


Download (VS2008): debug-activity.zip

Author: Categories: Open Source, WF Tags: ,

WPF TabControl transition effects with Transitionals

May 13th, 2008

Transitionals is a WPF framework that allows you to integrate nice transition effects into your WPF application with very little effort. It’s gone live a few days ago on CodePlex and definitely worth checking out:

http://www.codeplex.com/transitionals


I’ve downloaded the library today in order to incorporate a little eye candy into a prototype I’m doing. However, what I wanted to do was adding transition effects on a tab control, which is currently not supported out of the box by the framework:

Currently Transitionals ships with only two controls out of the box […]. Other controls, like a Tab control for example, could also be created. We encourage the community to come up with other common navigation and presentation scenarios that can leverage transitions.

This sounded like a lot of work, but luckily, it wasn’t: TabControl provides a ContentTemplate property which can be bound to a data template. This is were I put a TransitionElement control and bound it to the current content of the tab control:

<DataTemplate x:Key="TabTemplate">
  <t:TransitionElement Content="{Binding}">
    <!-- some more stuff -->
  </t:TransitionElement>
</DataTemplate>

<!-- tab control with content template -->
<TabControl ContentTemplate="{StaticResource TabTemplate}" />


These bindings take care of everything – a tab switch changes the content of the TransitionElement, which triggers a transition animation. All that was left to do was configuring a transition effect and adding some content to the tab control. Here’s the complete listing that uses a 3D rotation effect:


<Grid>
  <Grid.Resources>

    <!-- the data template binds the content to a transition element -->
    <DataTemplate x:Key="TabTemplate">
      <t:TransitionElement Content="{Binding}">
        <!-- rotate tab contents -->
        <t:TransitionElement.Transition>
          <trans:RotateTransition Duration="0:0:1.500"
                                  Angle="90" />
        </t:TransitionElement.Transition>
      </t:TransitionElement>
    </DataTemplate>

  </Grid.Resources>


  <TabControl ContentTemplate="{StaticResource TabTemplate}">

    <TabItem Header="First">
      <!-- some content -->
    </TabItem>

    <TabItem Header="Second">
     <!-- some content -->
    </TabItem>

  </TabControl>

</Grid>


My sample contains two tabs which both display the same image. Accordingly, the code snippet above produces the following 3D effect when switching tabs:

transition

Author: Categories: WPF, WPF Controls Tags: ,